I have personally made most of these with my own kids, and I can tell you which ones kept them busy for five minutes and which ones had them asking to do it again the next day. In this post, you will find 35 creative and fresh popsicle stick crafts for kids that go far beyond the usual picture frames and houses. Each one includes a full materials list and step-by-step setup instructions so you can actually pull it together without having to scroll back and forth ten times.
📌 Quick Note: This post contains affiliate links. I may earn a small commission if you purchase through them, at no extra cost to you.
If you are also looking for other easy crafts and activities to fill your afternoons, check out these 25 easy toddler activities at home and these easy DIY crafts and activities for kids for even more ideas.
Why Popsicle Stick Crafts Are Worth The Kids Time
Before we dive in, popsicle sticks are a must-have craft supply. They are affordable, easy to find, and sturdy enough for painting, gluing, and building fun projects kids will love.
Even better, popsicle stick crafts help develop fine motor skills, hand-eye coordination, creativity, and patience. Every project is not just fun; it is also a valuable learning experience.
For more activities that also build these skills, these 30 fine motor activities for toddlers at home pair perfectly with a craft afternoon.
What You Need Before You Start
Most of these popsicle stick crafts for kids use a core set of supplies. Stock these, and you will be ready for almost every project on this list:
- Popsicle sticks (regular and jumbo sizes)
- White school glue and a hot glue gun (adult use only for the hot glue)
- Acrylic paint or washable tempera paint
- Paintbrushes in various sizes
- Googly eyes
- Markers, both thick and fine tip
- Pipe cleaners, foam sheets, and pom poms
- Scissors
- Washi tape and masking tape
With those basics in hand, you are ready for every single project below. Additionally, if you want to combine popsicle stick crafts with sensory play, these 25 easy sensory bin ideas for toddlers work beautifully alongside craft time.
35 Easy Popsicle Stick Crafts for Kids to Make at Home
1. Popsicle Stick Weaving Loom
This is one of those popsicle stick crafts for kids that looks impressive but is genuinely simple to set up. Kids as young as four can weave once the loom is assembled.
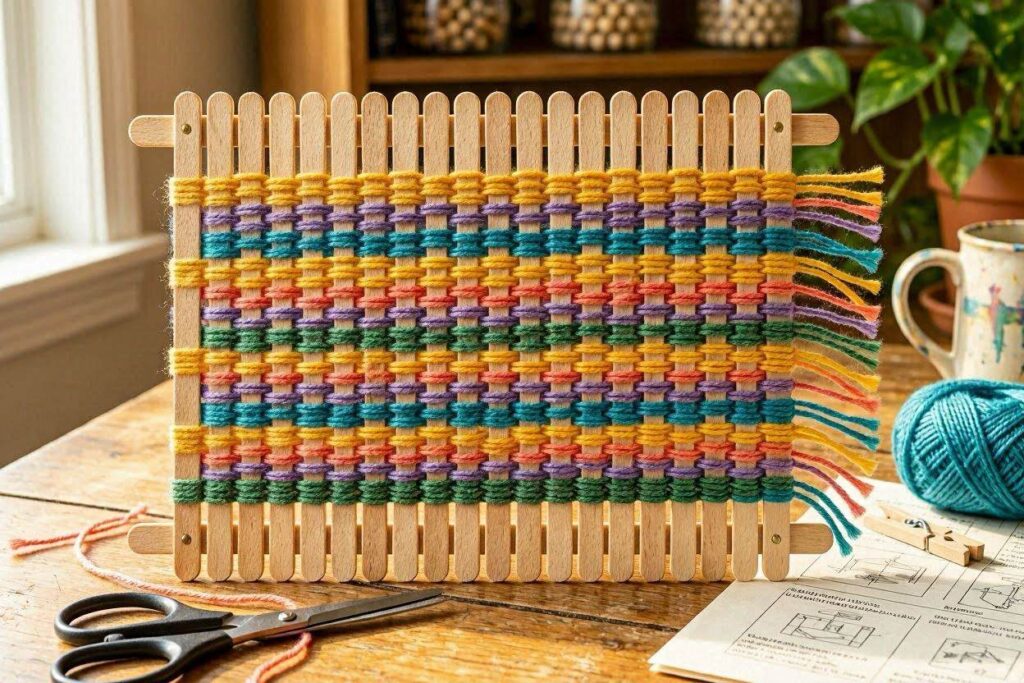
Materials needed: 6 popsicle sticks, school glue, colorful yarn in 3 to 4 colors, and scissors.
Step by step:
- Glue three popsicle sticks side by side horizontally at the top, and three more at the bottom, leaving a gap in the middle to create the loom frame.
- Let the glue dry completely, at least 30 minutes.
- Cut yarn into arm-length strips in various colors.
- Tie the first yarn strip to the left edge of the loom.
- Weave the yarn over and under, zigzagging across the loom from left to right.
- Add a new color each time and tie knots at the edges to secure.
- Trim any excess yarn at the ends.
The finished loom is a colorful wall hanging that kids feel incredibly proud of. Furthermore, the over-under weaving motion is excellent for hand coordination.
2. Mini Popsicle Stick Easel
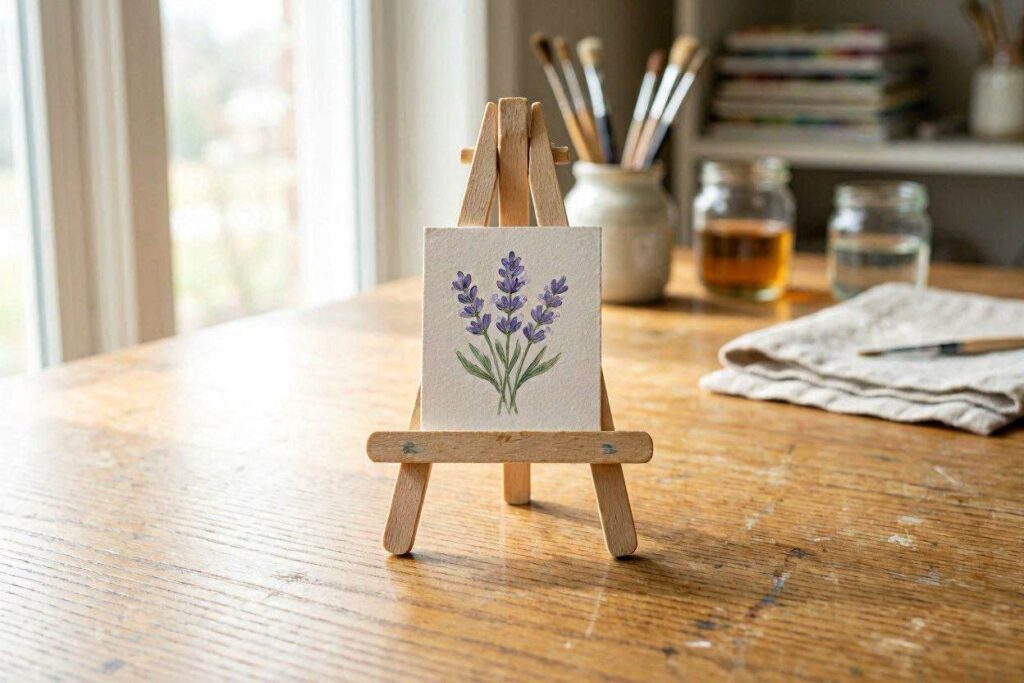
Materials needed: 5 popsicle sticks, a hot glue gun (adult use), and paint or markers to decorate.
Step by step:
- Glue two sticks together at the top to form an upside-down V shape, leaving about one centimeter of overlap at the top.
- Glue a third stick horizontally across the two V sticks, about halfway down, to act as a shelf for artwork.
- Glue a fourth stick diagonally from the bottom back to act as a kickstand.
- Let everything dry fully before decorating.
- Paint or use markers to personalize the easel.
These tiny easels are perfect for displaying small drawings or photos. They also make a thoughtful, handmade gift for grandparents or teachers.
3. Popsicle Stick Treasure Chest
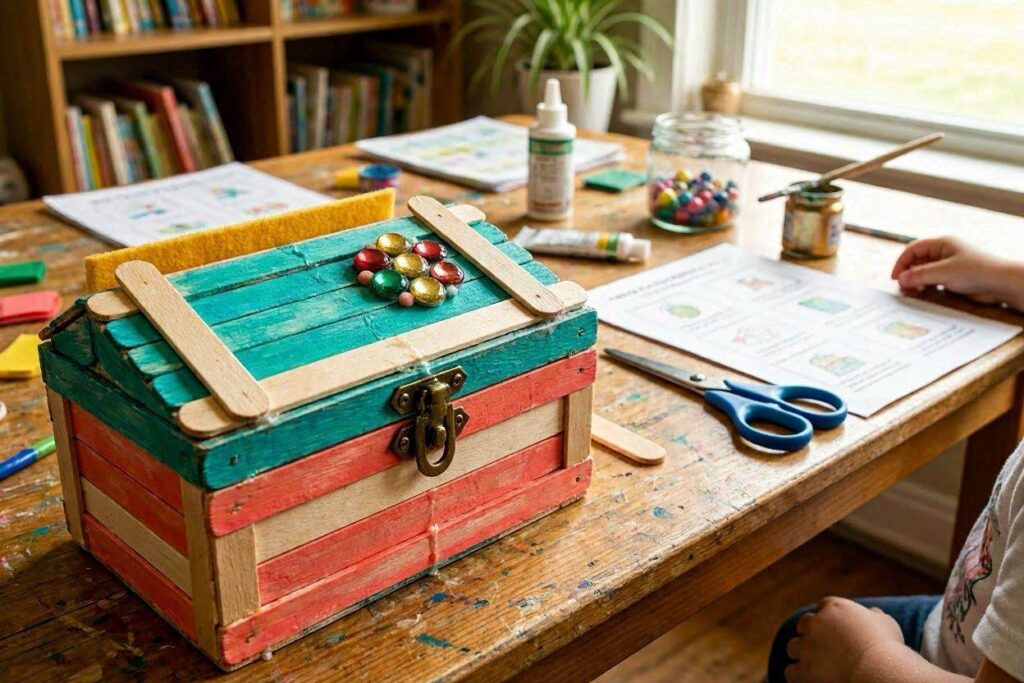
Materials needed: 20 popsicle sticks, school glue, brown and gold paint, a small hinge made from tape, markers.
Step by step:
- Build the base by laying 5 sticks side by side and gluing two sticks perpendicular across them at both ends to lock them together.
- Build four walls by stacking sticks log-cabin style, gluing each layer.
- Build a separate lid panel the same way, using slightly fewer sticks.
- Once dry, attach the lid to the back of the box with a strip of strong tape as a hinge.
- Paint the whole chest brown, then dry-brush gold paint over the edges.
- Add marker details like locks, hinges, and rivets.
Kids love having a secret box for their small treasures. This is one of those popsicle stick crafts for kids that becomes a cherished toy rather than just a one-use craft.
4. Stick Marble Maze
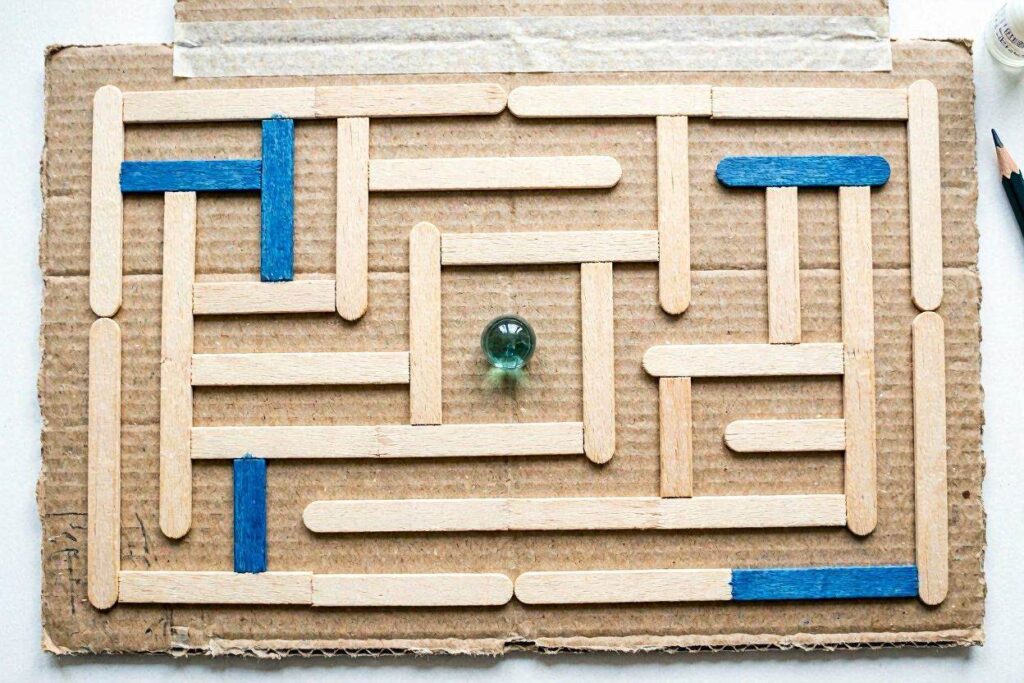
Materials needed: A piece of thick cardboard, 20 to 30 popsicle sticks, a hot glue gun (adult use), one small marble or ball bearing, and markers to decorate.
Step by step:
- Draw a simple maze pattern on the cardboard in pencil first.
- Use a hot glue gun to stick popsicle sticks upright along the maze lines.
- Make sure the walls are tall enough to keep the marble from jumping out.
- Create a clear start and finish point.
- Let the glue set completely, then test with the marble.
- Decorate the cardboard base and walls with markers.
This activity combines building with playing, so it keeps kids busy through both the making and the using phase. Older kids especially love designing their own maze layouts first.
5. Popsicle Stick Catapult
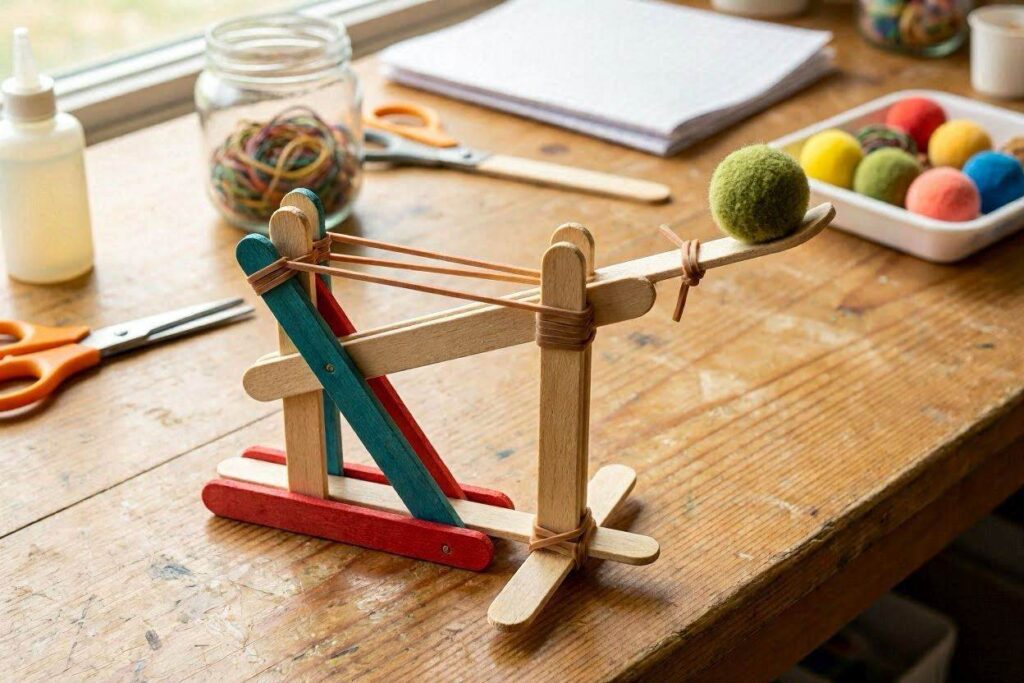
Materials needed: 7 popsicle sticks, 4 rubber bands, a plastic bottle cap, a hot glue gun (adult use), and pom poms for launching.
Step by step:
- Stack 5 sticks together and secure both ends tightly with rubber bands.
- Take the remaining 2 sticks and sandwich the stack of 5 between them at one end, creating a T shape. Secure with rubber bands.
- Glue a bottle cap to the top end of the single lever arm.
- Let the glue dry fully.
- Place a pom pom in the cap, press down the arm, and release.
This is genuinely one of the most exciting popsicle stick crafts for kids on this list. Kids can spend an entire afternoon launching pom poms across the room and measuring distances. It also introduces basic physics concepts without any formal teaching.
6. Popsicle Stick Photo Stand
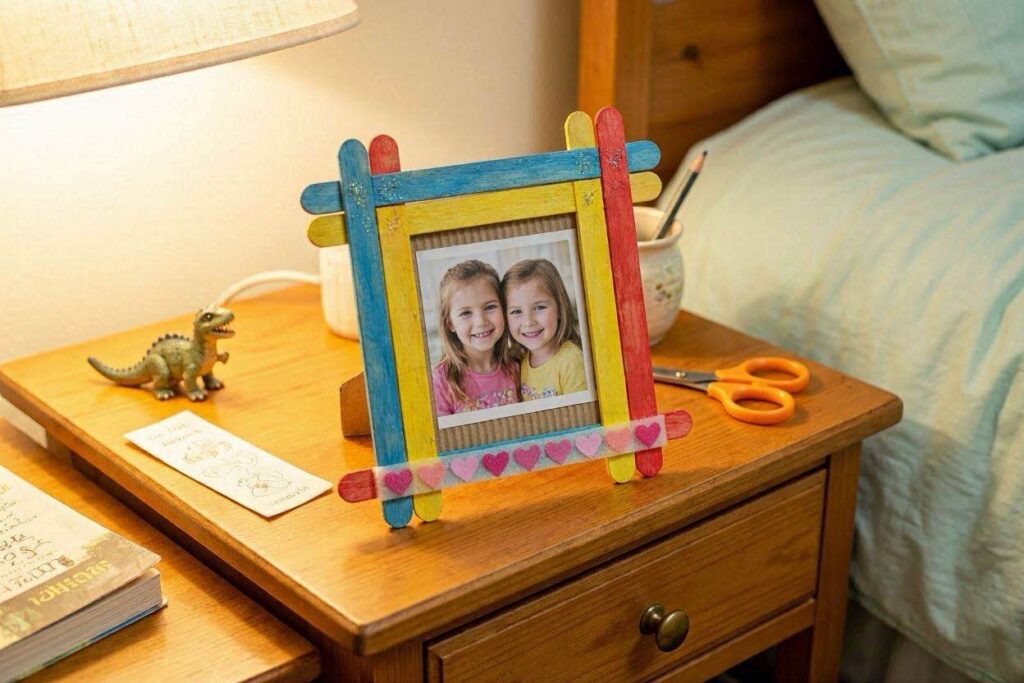
Materials needed: 10 popsicle sticks, school glue, paint or washi tape, a small printed photo, a thin strip of cardboard for the stand.
Step by step:
- Lay 6 sticks side by side vertically and glue two sticks across the top and bottom horizontally to create the frame panel.
- Let dry completely.
- Decorate with paint, washi tape, or markers.
- Glue a folded strip of cardboard to the back as a kickstand.
- Glue or clip the photo to the front of the frame.
Photo stands make wonderful gifts. Additionally, they are a great way to introduce kids to the idea of making something functional and beautiful at the same time.
7. Rainbow Popsicle Stick Mobile
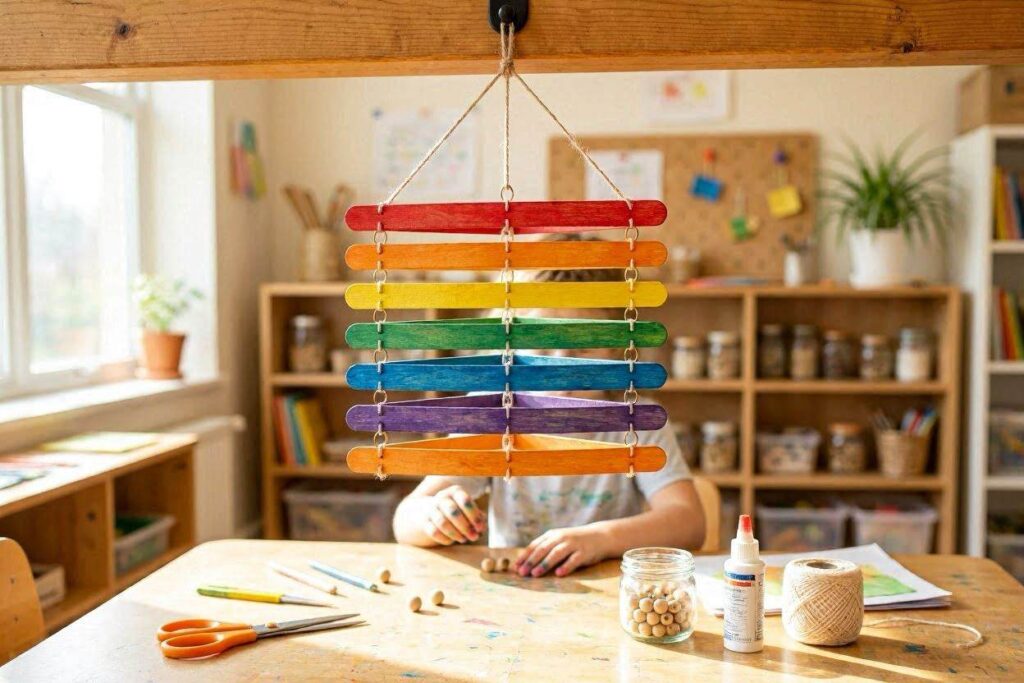
Materials needed: 14 popsicle sticks, paint in rainbow colors, string or yarn, scissors, a wooden dowel or single stick for hanging.
Step by step:
- Paint pairs of sticks in each rainbow color: two red, two orange, two yellow, two green, two blue, two purple, two pink.
- Once dry, bend each pair into an arch shape and glue the ends together.
- Tie strings of different lengths to each arch.
- Tie all strings to the hanging dowel, spacing the arches evenly along it.
- Hang the finished mobile from the ceiling or a curtain rod.
A rainbow mobile turns any bedroom into a magical space. Furthermore, painting each stick its own color makes this project a perfect introduction to color mixing and sequencing for younger kids.
8. Popsicle Stick Puzzle
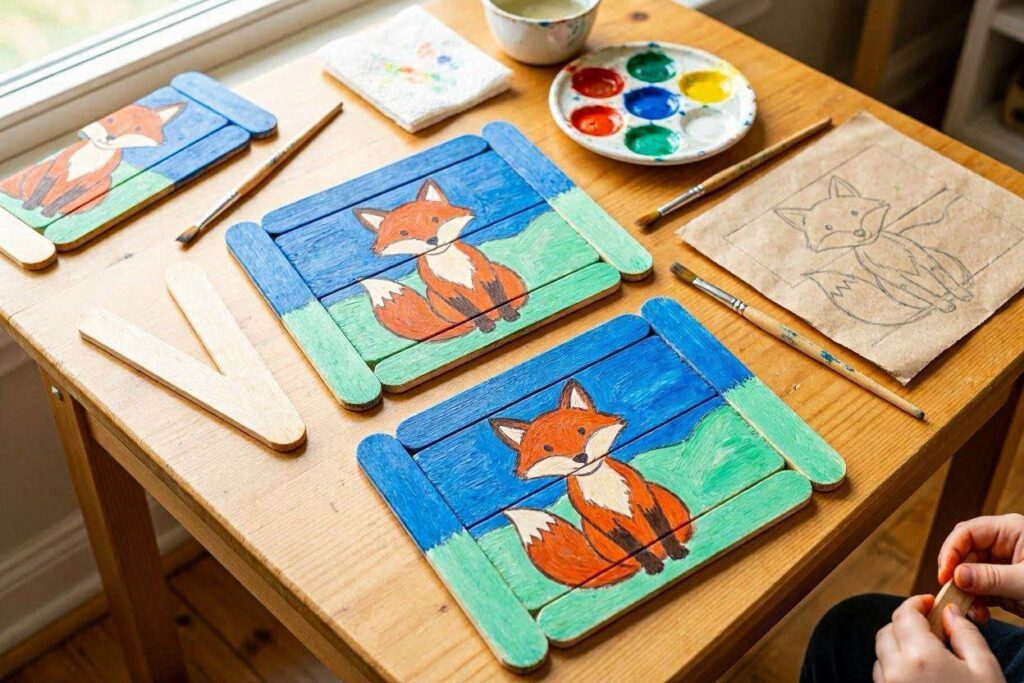
Materials needed: 8 popsicle sticks, masking tape, paint, and paintbrushes.
Step by step:
- Line up 8 sticks side by side and tape across them on one side to hold them together temporarily.
- Flip the taped bundle over so the unmarked side faces up.
- Paint any design on the surface: a rainbow, an animal, a landscape, or a simple geometric pattern.
- Let the paint dry completely.
- Remove the tape and scramble the sticks.
- Challenge your child to reassemble the puzzle by matching the painted image.
This is one of those popsicle stick crafts for kids that children can make for each other. Siblings love making puzzles and then swapping them to solve. It is a two-in-one activity that fills a whole afternoon.
9. Popsicle Stick Name Art
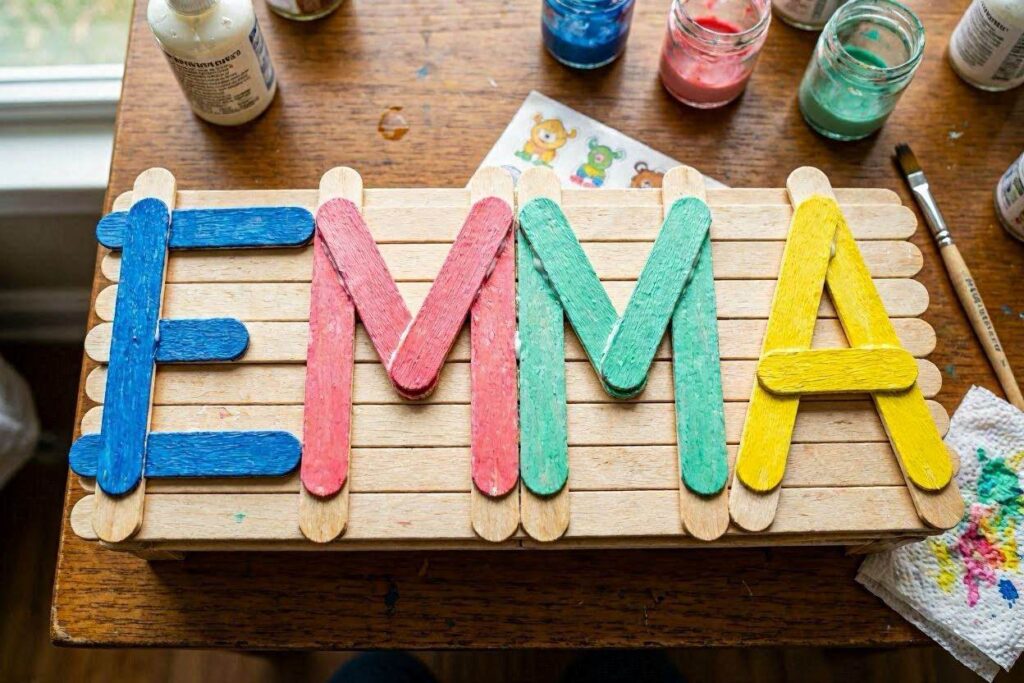
Materials needed: 20 to 30 popsicle sticks, depending on the name length, a hot glue gun (adult use), paint, and a backing piece of cardboard or canvas board.
Step by step:
- Plan out each letter of the child’s name using popsicle sticks as the lines and curves.
- Paint the sticks in bright colors before assembling, or after.
- Arrange the sticks into each letter on the cardboard backing.
- Glue each stick down firmly.
- Let dry, then display on a bedroom wall or door.
Name art is deeply personal, and kids love seeing their own name made into wall art. Consequently, this one makes an incredible room decoration and a popular personalized gift idea.
10. Mini Popsicle Stick Fence Garden Marker
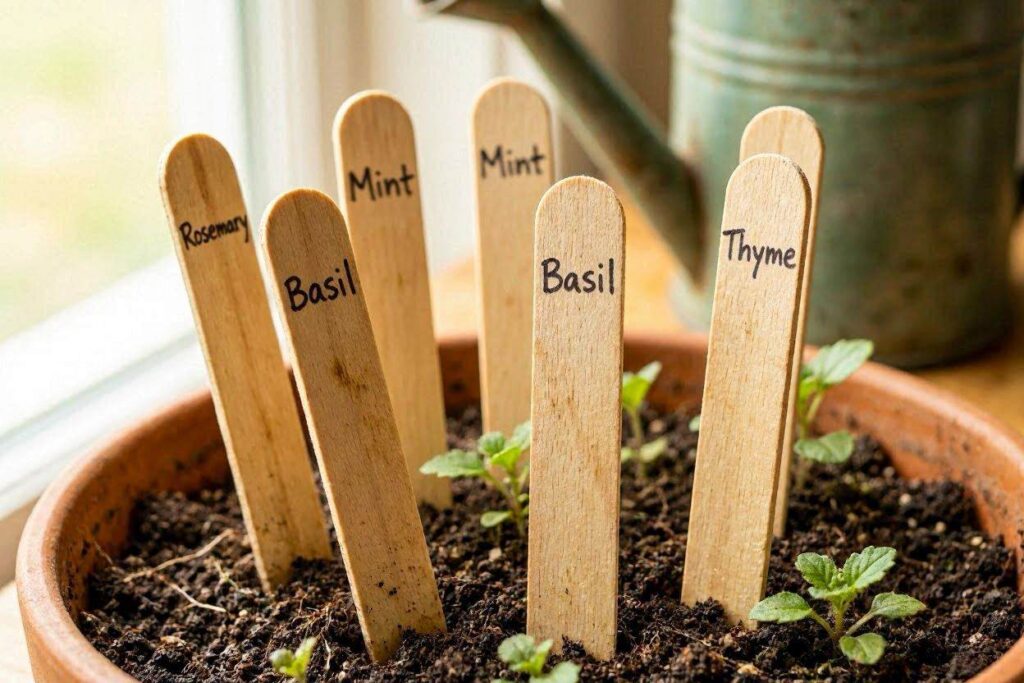
Materials needed: 3 popsicle sticks per marker, school glue, waterproof markers or paint, optional: wood sealant for outdoor use.
Step by step:
- Glue two sticks upright and parallel, leaving space between them.
- Glue a third stick horizontally across the top of both to make a gate or fence post shape.
- Let dry completely.
- Write the plant name on the horizontal stick with a waterproof marker.
- Decorate with small painted flowers or patterns.
- Push the bottom of the two upright sticks into garden soil or a plant pot.
These garden markers are practical and adorable. If your kids are into outdoor time and nature, combining this with sensory and outdoor play ideas like these 50 easy toddler play ideas makes for a full day of natural exploration.
11. Popsicle Stick Bookmarks
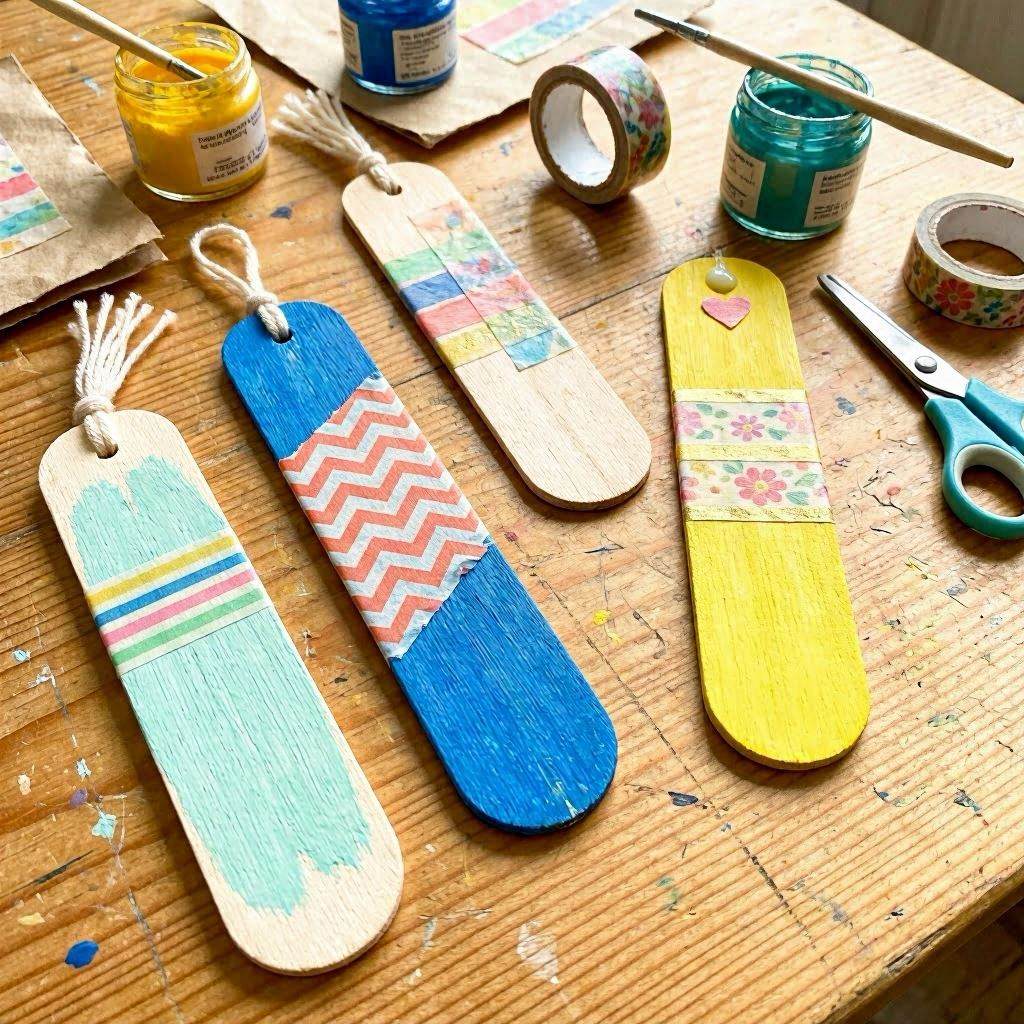
Materials needed: One popsicle stick per bookmark, paint or markers, washi tape, googly eyes, foam stickers, and optional ribbon.
Step by step:
- Paint or color the popsicle stick as a base color.
- Once dry, decorate with washi tape strips, drawn faces, or foam sticker shapes.
- Add googly eyes to make a character bookmark.
- Tie a small piece of ribbon to one end for a decorative touch.
Kids who love reading are especially excited about making their own bookmarks. These also make easy and inexpensive party favors or teacher appreciation gifts.
12. Popsicle Stick Butterfly
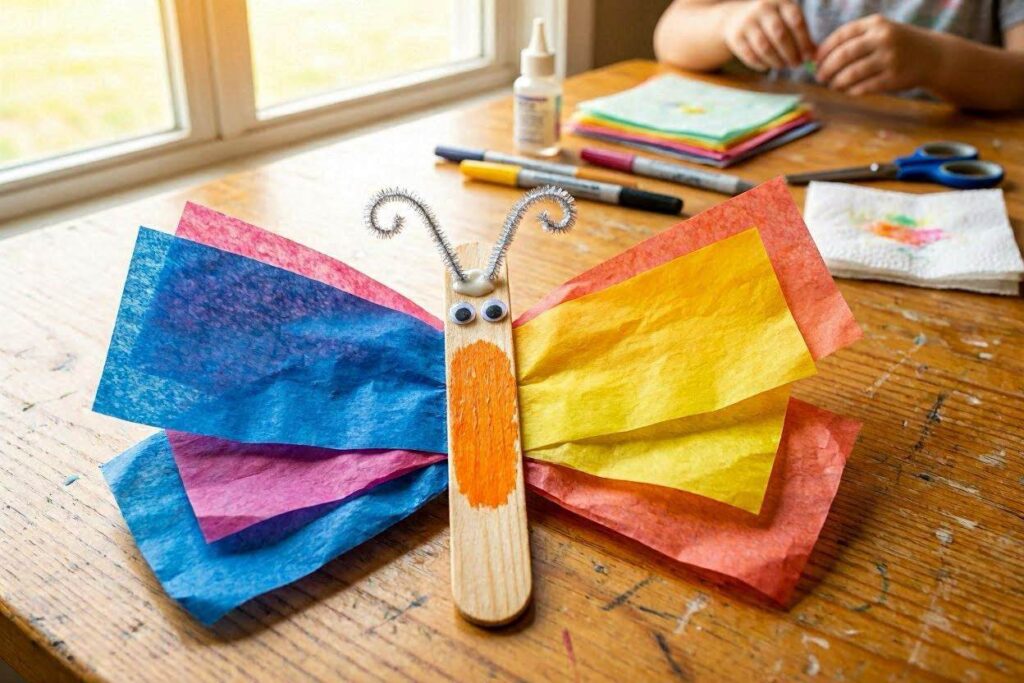
Materials needed: 2 popsicle sticks, tissue paper in two or three colors, school glue, googly eyes, a pipe cleaner for antennae, and markers.
Step by step:
- Cross two popsicle sticks in the middle and glue at the intersection.
- Cut tissue paper into petal or teardrop shapes for wings.
- Glue tissue paper wings onto each of the four arms of the cross.
- Bend a pipe cleaner in half, twist it at the center, and glue the twisted part to the top of the cross as antennae.
- Glue googly eyes onto the intersection point and draw a small smile below them.
These tissue paper butterflies look beautiful hung in a window where light shines through the wings. Additionally, making a whole collection of different colored butterflies and stringing them together creates a stunning mobile.
13. Popsicle Stick Kaleidoscope Pattern Art

Materials needed: 16 to 24 popsicle sticks, paint in bright or neon colors, a sheet of black or dark cardstock, and school glue.
Step by step:
- Paint each popsicle stick a different bright color and let it dry.
- Arrange the sticks on the cardstock in a radial or sunburst pattern, all meeting at a central point.
- Adjust spacing until the pattern looks balanced and full.
- Glue each stick down firmly.
- Add a second layer of shorter sticks between the first layer for a more intricate design.
- Let dry completely before displaying.
Against dark paper, the neon colored sticks look almost like stained glass. This is one of the most visually striking popsicle stick crafts for kids, and it doubles as wall art.
14. Popsicle Stick Finger Puppets

Materials needed: One stick per puppet, foam sheets, googly eyes, markers, school glue, and small pom poms for noses.
Step by step:
- Draw and cut small animal ear shapes from foam sheets.
- Glue ears to the top of each stick.
- Glue two googly eyes onto the stick, just below the ears.
- Glue a small pom pom as a nose.
- Use markers to draw a mouth, whiskers, or any other facial details.
- Hold the stick between two fingers to use as a finger puppet.
Kids naturally start making up stories once they have a set of puppets in their hands. Furthermore, making the puppets is only half the fun. The other half is the full puppet show that follows.
15. Popsicle Stick Pinwheel
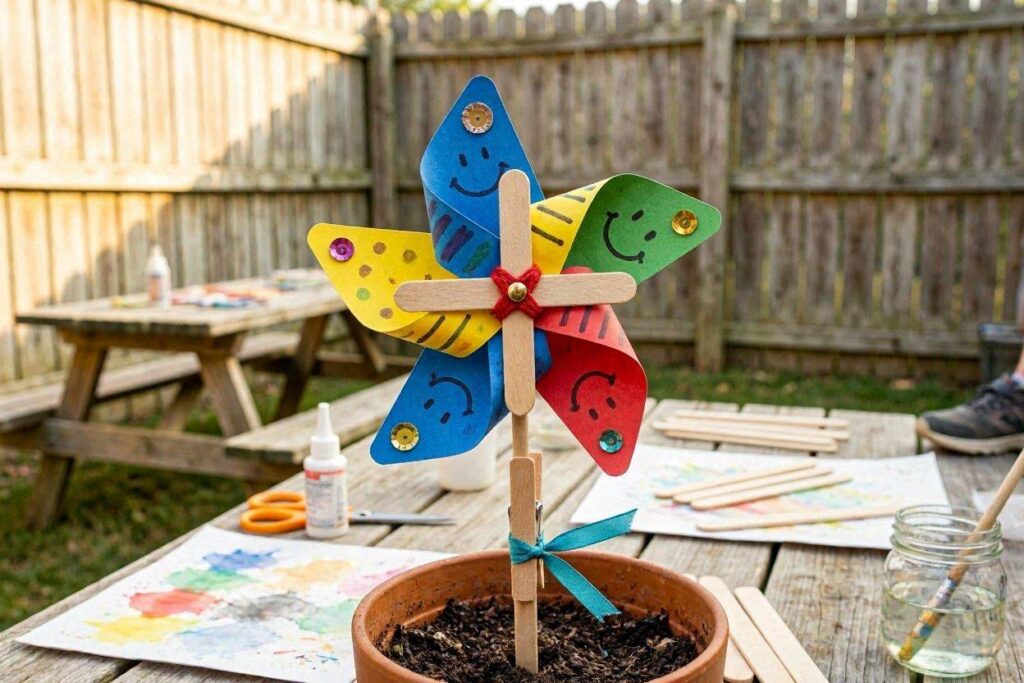
Materials needed: 2 popsicle sticks, a square of stiff paper, scissors, a brass paper fastener, and paint or markers.
Step by step:
- Decorate both popsicle sticks with paint or markers.
- Cut the paper square from corner to corner, stopping before the center on each cut.
- Bring every other point to the center and hold them together.
- Push a brass fastener through all four points at the center.
- Attach the fastener to the tip of one popsicle stick.
- Glue the second popsicle stick to the back of the first as a reinforcement handle.
Pinwheels work beautifully outdoors and are one of those popsicle stick crafts for kids that the whole family ends up playing with. They are especially popular in the garden or on a windy day at the park.
16. Popsicle Stick Clock
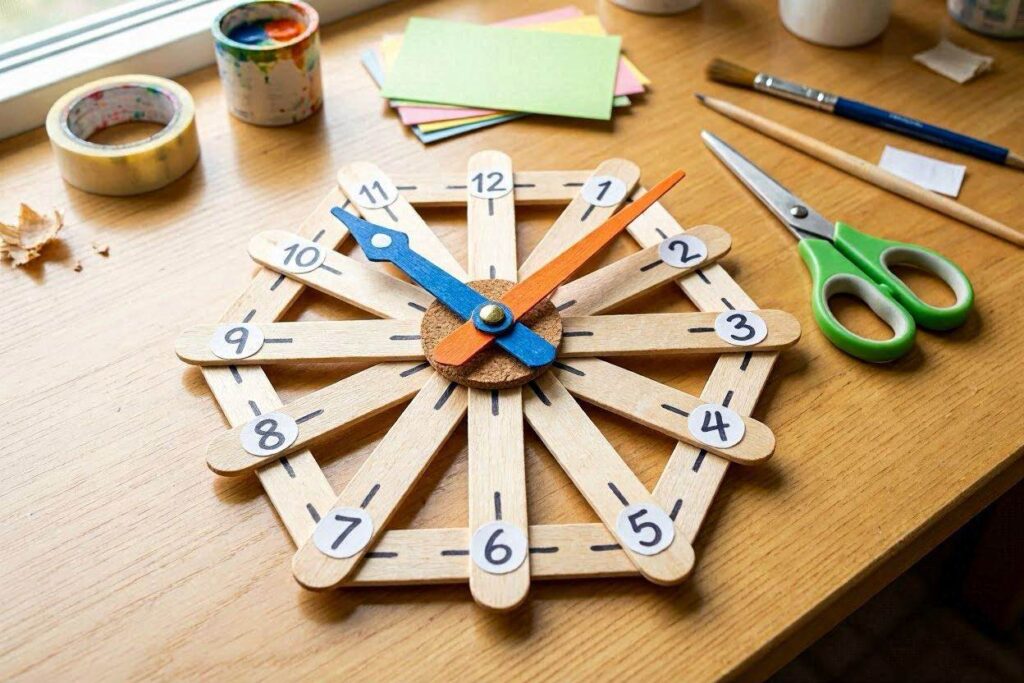
Materials needed: 12 popsicle sticks, a circle of cardboard, paint, markers, two smaller sticks for the hands, and a brass fastener.
Step by step:
- Glue 12 popsicle sticks around the edge of the cardboard circle at equal intervals, like clock positions.
- Write numbers 1 through 12 on the ends of each stick.
- Paint the clock face a solid color.
- Cut two sticks to make clock hands, one shorter and one longer.
- Pierce all three layers at the center with a brass fastener, leaving the hands loose enough to move.
- Practice telling time by moving the hands to different positions.
This is a genuinely useful learning toy that kids help build themselves. Furthermore, children are far more engaged with a tool they made with their own hands than one that came from a box.
17. Popsicle Stick Mini Greenhouse
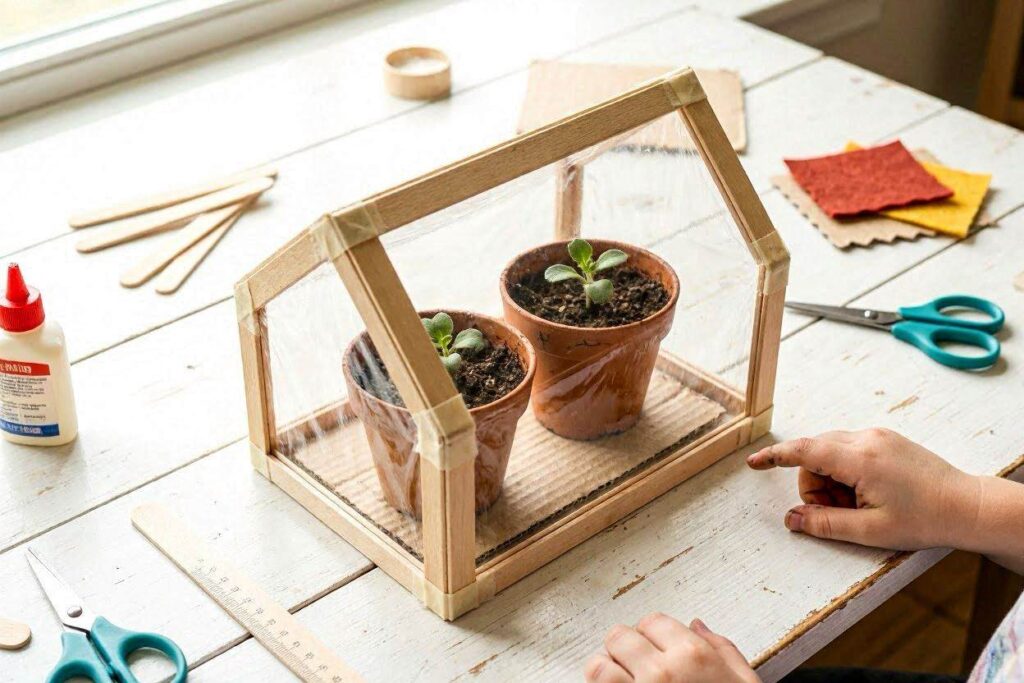
Materials needed: 30 popsicle sticks, a hot glue gun (adult use), clear plastic wrap or a small zip-top bag, and small seedlings or seeds in soil.
Step by step:
- Build a rectangular base frame from sticks, gluing corners firmly.
- Build up four walls by layering sticks log-cabin style.
- Create a simple roof frame from sticks and cover it with stretched plastic wrap.
- Glue the roof onto the walls.
- Place a small pot or tray of seedlings inside.
This combines crafting with a simple science lesson. Kids can plant a seed, cover it with their homemade greenhouse, and watch it sprout over the following days. It is one of those popsicle stick crafts for kids that teaches patience in the most satisfying way possible.
18. Popsicle Stick Bow and Arrow
Materials needed: 3 popsicle sticks, 2 rubber bands, a bamboo skewer or thin wooden chopstick for the arrow, tape, and foam for the arrowhead.
Materials needed: 3 popsicle sticks, rubber bands, a thin skewer (blunt-tipped), tape, and foam.
Step by step:
- Gently bend one popsicle stick into an arc shape and tie a rubber band from one end to the other to hold the curve.
- Reinforce the back of the bow by gluing the two remaining sticks on either side of the curved one.
- Let the glue dry completely.
- Cut a small diamond from foam and tape it to the blunt end of the skewer as the arrowhead.
- Notch the opposite end of the skewer slightly so it sits on the rubber band string.
Always supervise this one closely and aim only at soft targets like pillows. However, for older kids, this is an absolutely thrilling popsicle stick craft for kids that they will want to show everyone.
19. Popsicle Stick Number Learning Boards
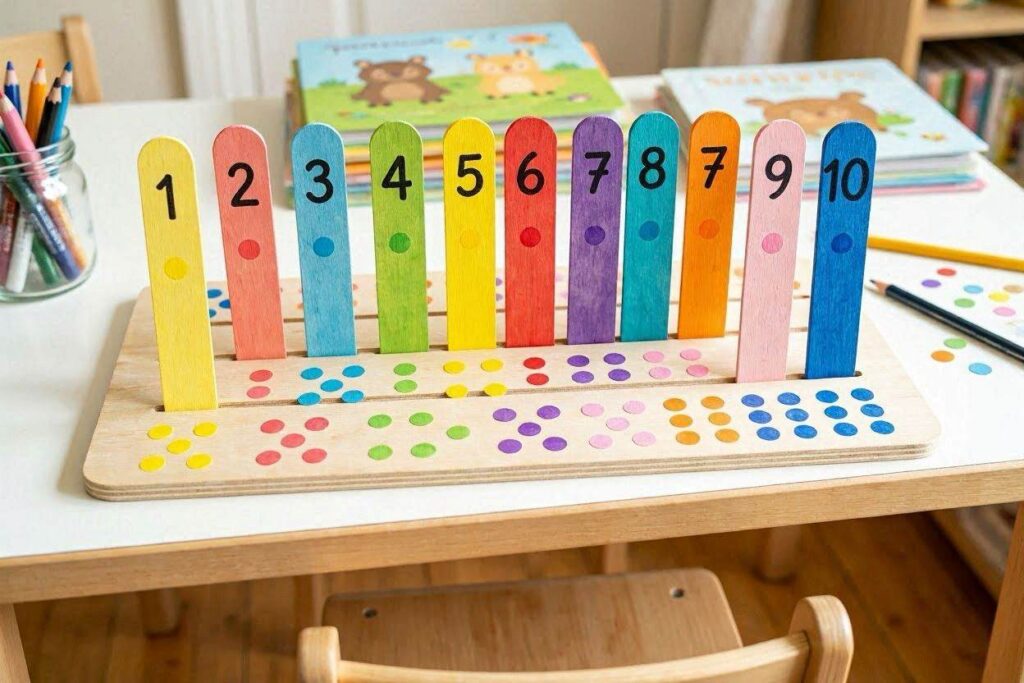
Materials needed: A cardboard base, popsicle sticks, paint, markers, and school glue.
Step by step:
- Divide the cardboard into sections, one for each number from 1 to 10.
- Write the number in each section with a marker.
- In each section, glue the matching number of popsicle sticks.
- Paint each section a different color for visual distinction.
- Let dry and use as a counting reference board for young learners.
This is one of those popsicle stick crafts for kids that crosses over into learning without feeling like a lesson. Kids help build the tool and then use it to learn numbers. That combination is incredibly powerful for early childhood learning.
20. Popsicle Stick Flower Bouquet
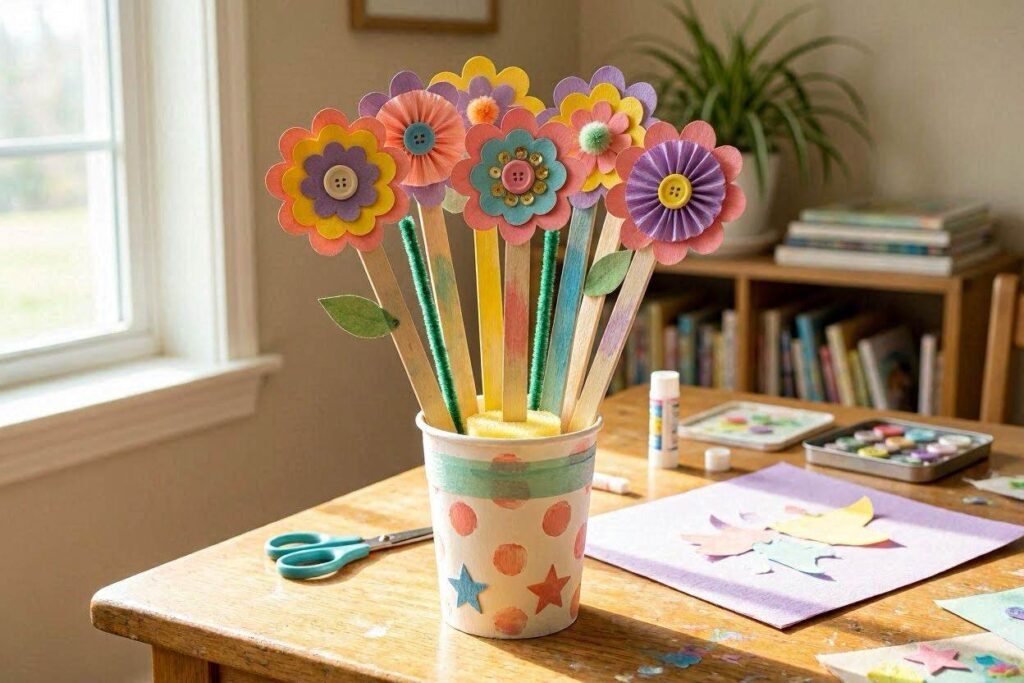
Materials needed: One stick per flower, foam or tissue paper in multiple colors, scissors, school glue, a cup or jar to display them, and paint.
Step by step:
- Cut petal shapes from foam or tissue paper.
- Glue 5 to 6 petals around a central point on the tip of a popsicle stick.
- Glue a small circular foam piece or button in the center of the petals.
- Paint or decorate the stick as the stem.
- Repeat for as many flowers as you like.
- Arrange the finished flowers in a cup or decorated jar.
A completed bouquet makes a beautiful and lasting gift for grandparents, teachers, or a family friend. Furthermore, kids are incredibly proud to give something they made themselves entirely. For more creative craft ideas like this, explore these 25 easy bottle art ideas for kids.
21. Popsicle Stick Mosaic Art
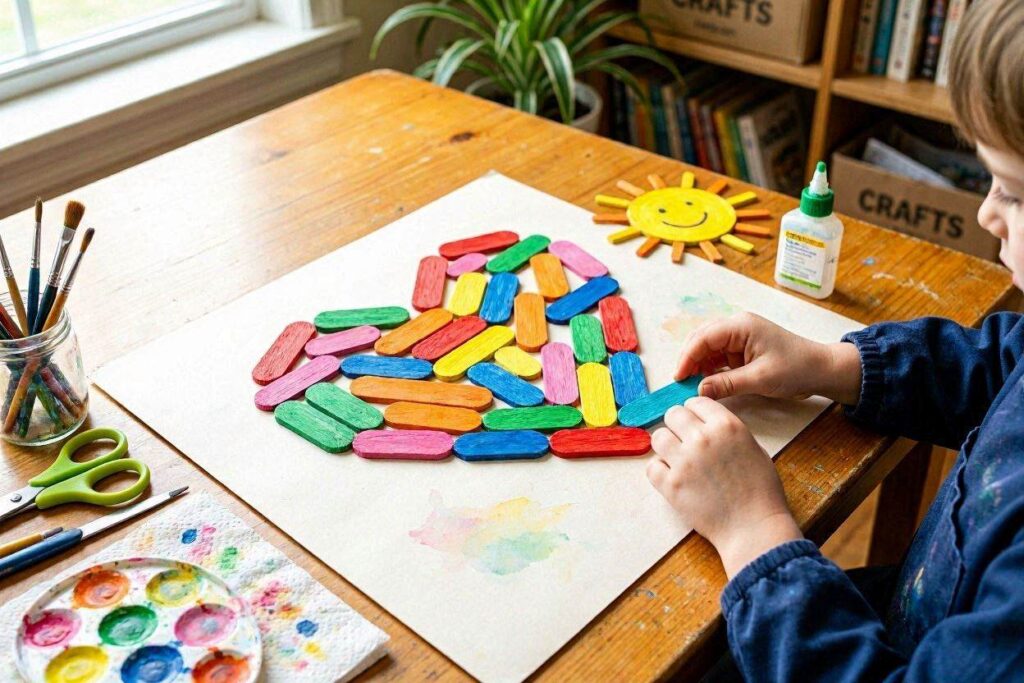
Materials needed: 20 to 30 popsicle sticks, paint in multiple colors, school glue, a cardboard backing, scissors, or an adult to snap sticks into pieces.
Step by step:
- Paint the sticks in various bright colors and let them dry.
- An adult snaps or cuts some sticks into shorter pieces of varied lengths.
- Draw a simple outline on the cardboard: a bird, a sun, a house, or abstract shapes.
- Fill the outline by gluing sticks and stick pieces inside it, fitting them together like a mosaic.
- Fill any background space with sticks in a contrasting color.
- Let dry flat overnight.
Mosaic art teaches kids about filling space, color contrast, and patience. It is one of the more meditative popsicle stick crafts for kids and tends to attract older kids who enjoy detail work.
22. Popsicle Stick Domino Set
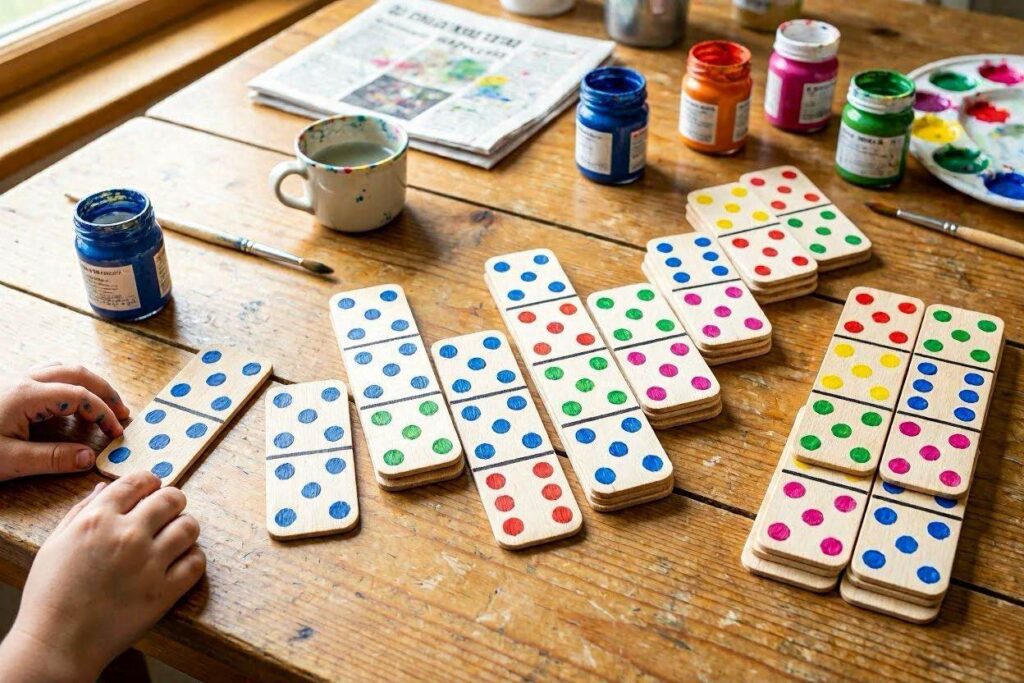
Materials needed: 28 popsicle sticks (standard domino set), white paint, black marker or black paint, and a small ruler.
Step by step:
- Paint all sticks white and let them dry.
- Draw a line across the middle of each stick to divide it into two squares.
- Paint dots in each half according to standard domino combinations: 0-0, 0-1, 0-2, and so on up to 6-6.
- Let it dry fully before playing.
Making their own domino set takes time, but the result is a real game that the whole family can play together. Additionally, the counting and dot arrangement involved in making the set is a math lesson all on its own.
23. Popsicle Stick Memory Card Holder
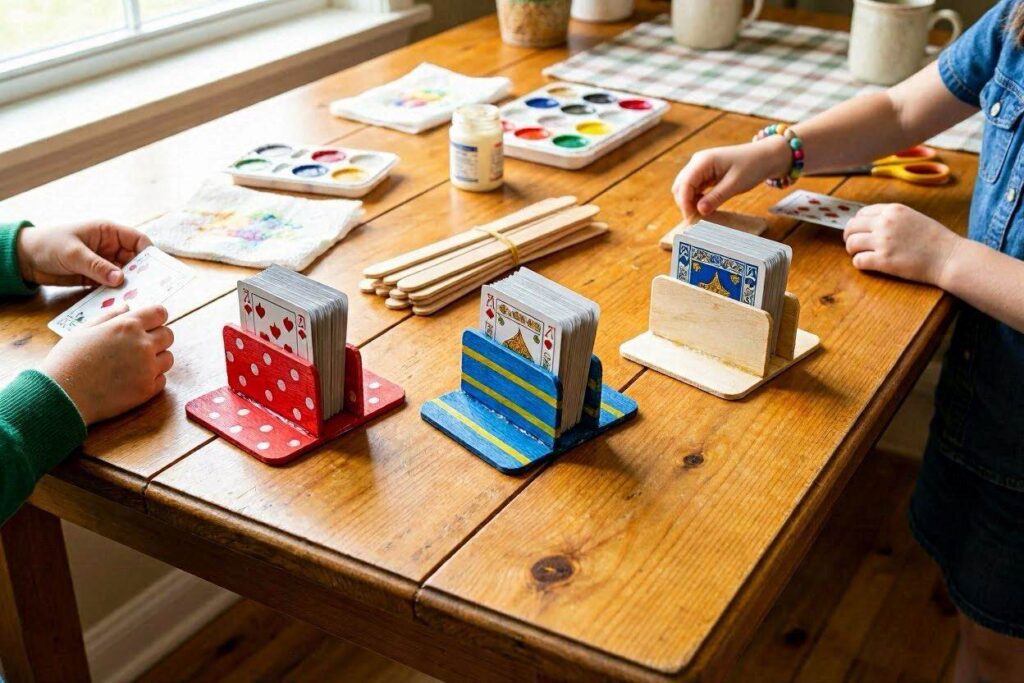
Materials needed: 6 popsicle sticks, school glue, rubber bands to hold while drying, and paint or markers.
Step by step:
- Fan out 4 sticks in a fan shape, overlapping them slightly at the base.
- Glue the overlapping base together firmly.
- Wrap a rubber band around the base while drying to hold the pressure.
- Glue a fifth stick flat across the back of the base for reinforcement.
- Glue a sixth stick perpendicular to the fifth as a foot so it stands up on the table.
- Decorate and let dry completely before use.
- Slide playing cards between the spread sticks.
This is especially helpful for younger kids playing card games, since holding a hand of cards can be tricky for small fingers. It is one of those popsicle stick crafts for kids that solves a real problem.
24. Popsicle Stick Xylophone
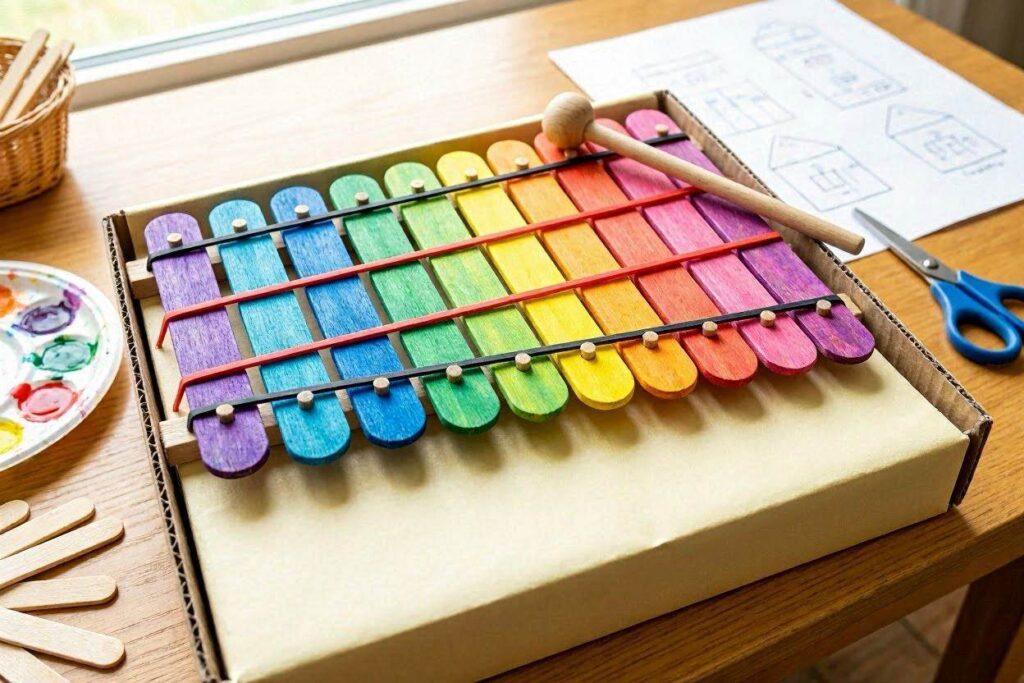
Materials needed: 12 popsicle sticks in varied lengths (cut a few shorter), two thick base sticks, school glue, and a thin wooden dowel as a mallet.
Step by step:
- Glue two base sticks parallel to each other, a few centimeters apart.
- An adult cuts the remaining sticks into graduated lengths.
- Lay the graduated sticks across the two base sticks from shortest to longest, like real xylophone keys.
- Glue each key lightly at the ends where it rests on the base sticks.
- Let dry, then tap the keys with a thin wooden dowel.
Each key length produces a slightly different sound. While it is not perfectly tuned, kids absolutely love tapping it and discovering that length affects pitch. It is an easy STEM-meets-music popsicle stick craft for kids
25. Popsicle Stick Spinning Tops
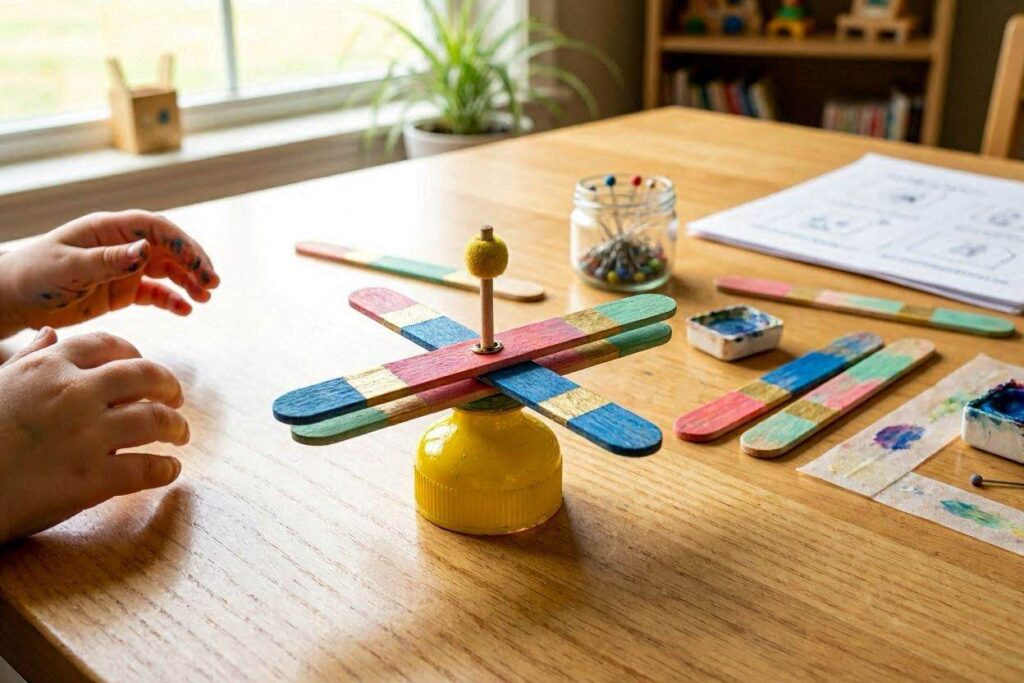
Materials needed: 4 popsicle sticks per top, a large button, a small wooden bead or cork piece, a hot glue gun (adult use), and paint.
Step by step:
- Cross two sticks to form an X and glue at the intersection.
- Cross the other two sticks on top at a 45-degree offset to form an eight-pointed star.
- Glue all four sticks together at the center.
- Glue a large flat button on top of the center for weight and decoration.
- Glue a small bead to the very bottom center as the spinning tip.
- Paint the arms in alternating colors.
- Spin it on a smooth, hard surface.
The weight of the button and the bead tip creates a surprisingly good spin. Kids love spinning these and comparing whose top spins the longest.
26. Popsicle Stick Jellyfish
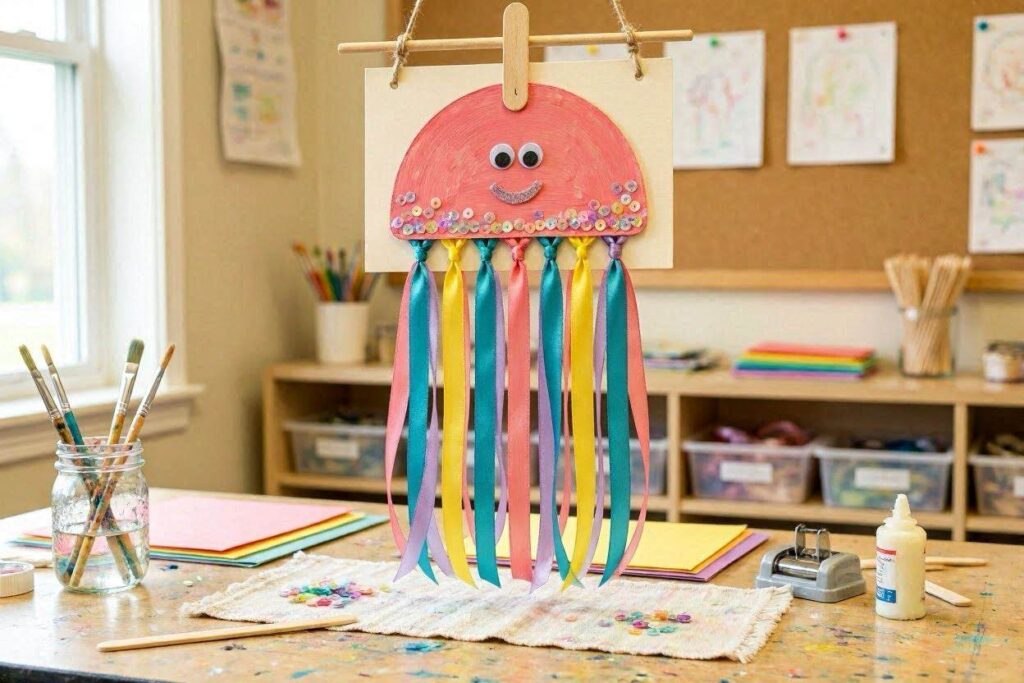
Materials needed: 10 popsicle sticks, school glue, colorful ribbon or crepe paper strips, paint, googly eyes, and string for hanging.
Step by step:
- Arrange 8 sticks in a circular dome shape, all ends meeting at the center.
- Glue all ends at the center and let them dry.
- Paint the dome in ocean colors: blue, purple, pink.
- Attach long ribbon or crepe paper strips to the bottom outer edge of the dome as tentacles.
- Add googly eyes to the front.
- Tie a string to the top center and hang it from the ceiling.
A group of these hanging together in different sizes looks like an entire underwater scene. Furthermore, this pairs beautifully with ocean-themed sensory bins from the sensory bin for 2-year-olds ideas on this site.
27. Popsicle Stick Pencil Holder
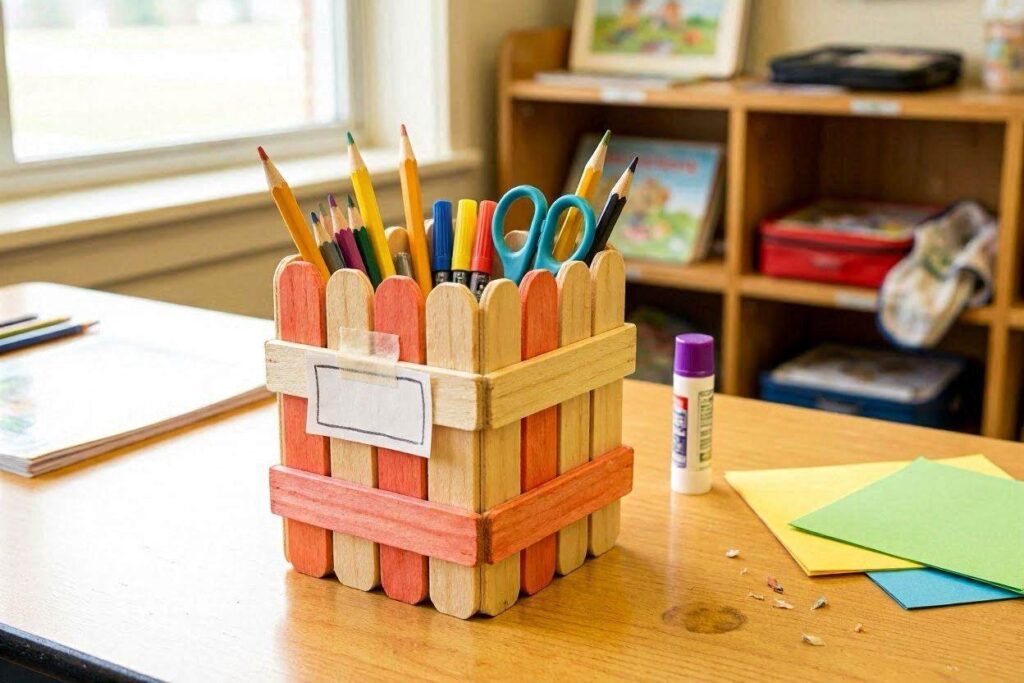
Materials needed: 30 to 40 popsicle sticks, a clean tin can or cardboard tube, school glue, paint, or washi tape.
Step by step:
- Apply a layer of glue to the outside of the can.
- Press the popsicle sticks vertically against the can, side by side, all the way around.
- Add a rubber band around the sticks while the glue dries to hold them in place.
- Once dry, remove the rubber band and paint the whole holder or wrap washi tape around it in stripes.
- Let dry and fill with pencils, markers, or scissors.
Every child can have a personalized desk organizer that they made themselves. This is one of those practical popsicle stick crafts for kids that stays on the desk for years.
28. Popsicle Stick Mancala Board
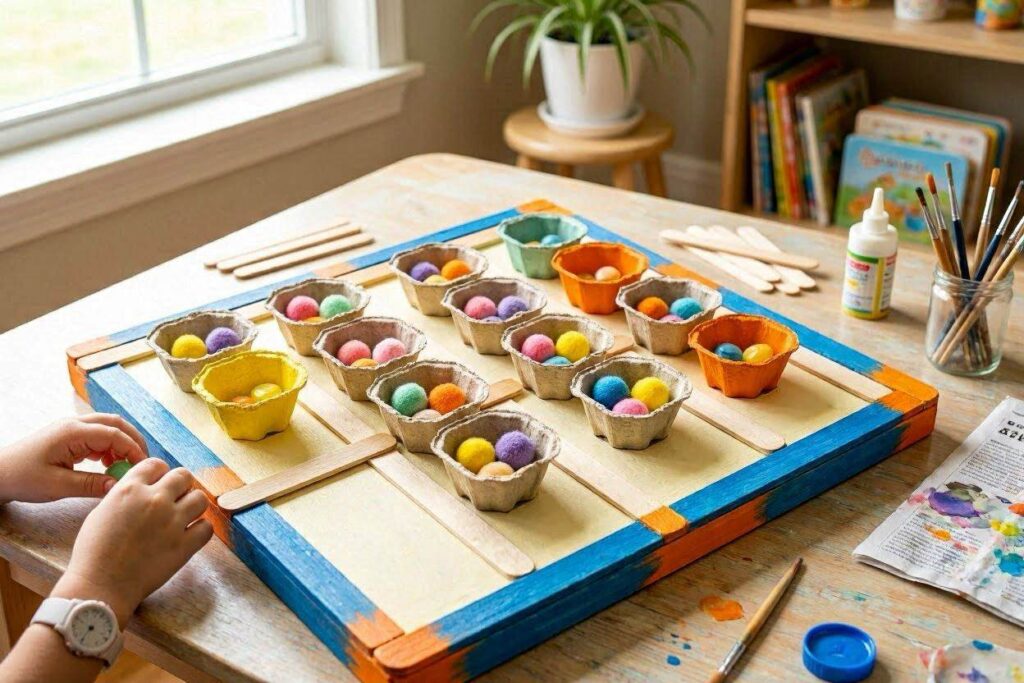
Materials needed: 20 popsicle sticks, a cardboard egg carton, a hot glue gun (adult use), paint, 48 small stones, buttons, or dried beans as game pieces.
Step by step:
- Cut the egg carton in half lengthwise to create two rows of six cups.
- Glue both halves side by side.
- Build a popsicle stick frame around the egg carton, gluing sticks along all four edges.
- Create two end pockets by building small stick boxes at each short end of the board.
- Paint the whole board.
- Place 4 game pieces in each cup and play using standard mancala rules.
Making a real board game from scratch is deeply satisfying for older kids. Additionally, mancala is genuinely good for strategic thinking and counting, so this is a craft with serious play value.
29. Popsicle Stick Sunflower
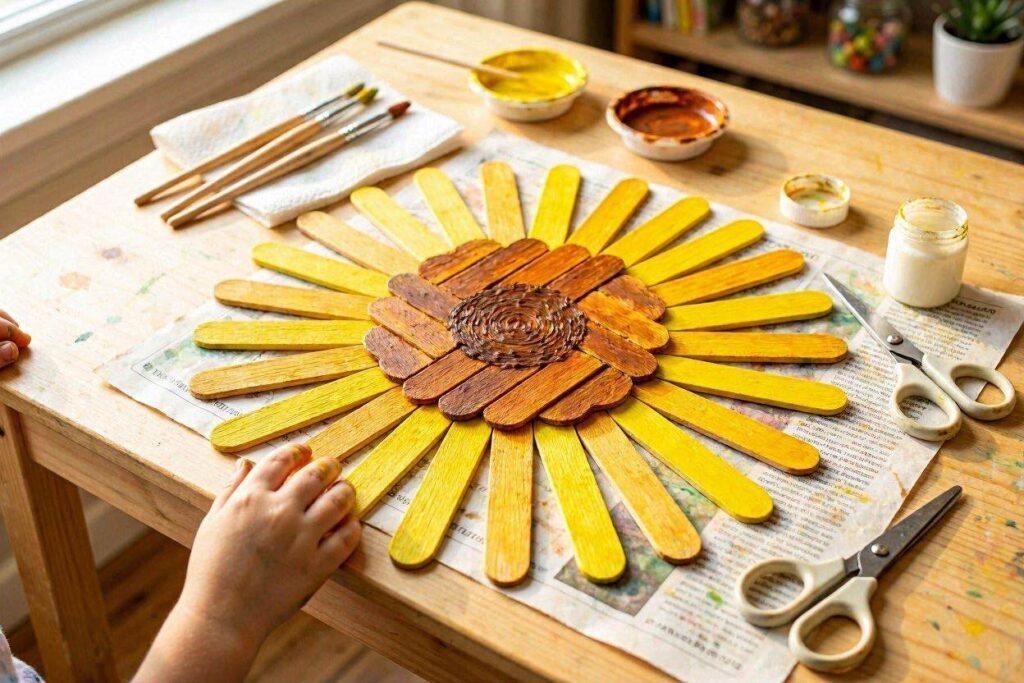
Materials needed: 12 popsicle sticks, a large circular piece of cardboard or a thick cardboard disk, yellow and brown paint, seeds (optional for the center), and school glue.
Step by step:
- Paint the cardboard circle dark brown.
- Paint all 12 popsicle sticks bright yellow.
- Once dry, glue the yellow sticks around the edge of the brown circle, pointing outward like petals.
- Optionally, glue real sunflower seeds or small brown beads onto the center circle for texture.
- Add a painted stick or garden cane to the back as a stem.
- Display in a pot of sand or soil.
Sunflowers are one of those popsicle stick crafts for kids that photographs beautifully, too. A shelf full of handmade popsicle stick flowers looks genuinely stunning.
30. Popsicle Stick Letter Tracing Board
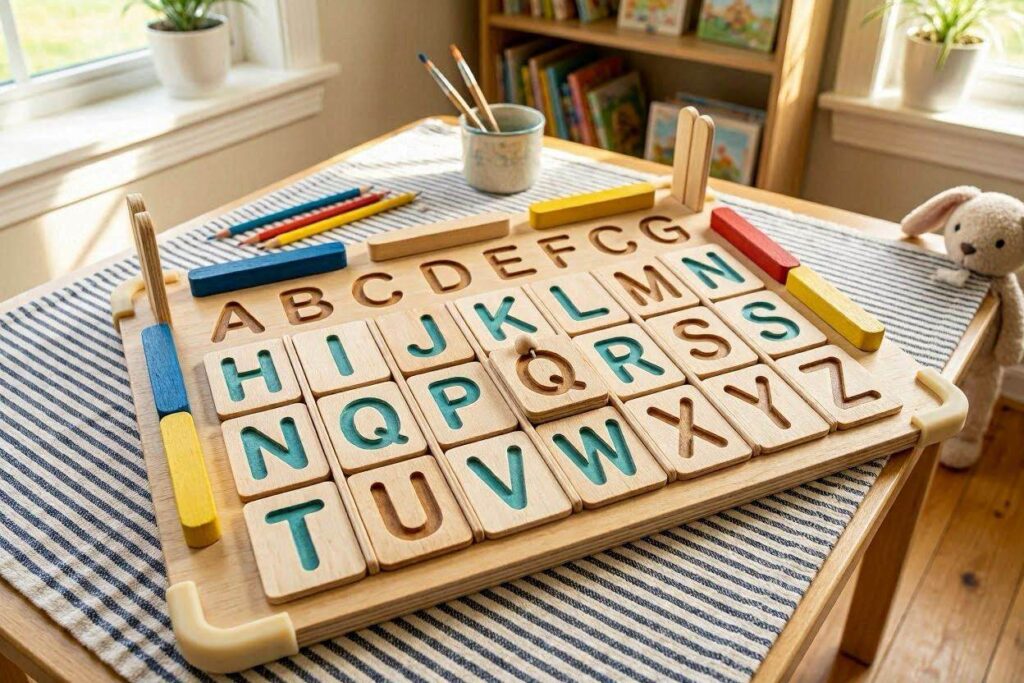
Materials needed: Cardboard squares, popsicle sticks, school glue, paint, and markers.
Step by step:
- Write a large letter on each cardboard square in pencil.
- Snap or cut popsicle sticks to fit along the lines of each letter.
- Glue the stick pieces along the letter outline.
- Paint each letter board in a bright, distinct color.
- Let dry and use as tactile letter cards for learning the alphabet.
Tactile letter cards are used in Montessori and early literacy programs because touching the letter shape while saying its name builds a stronger memory connection. This is one of the most genuinely educational popsicle stick crafts for kids on this list. You can also pair this with free printable coloring pages for kids that match each letter.
31. Popsicle Stick Kite
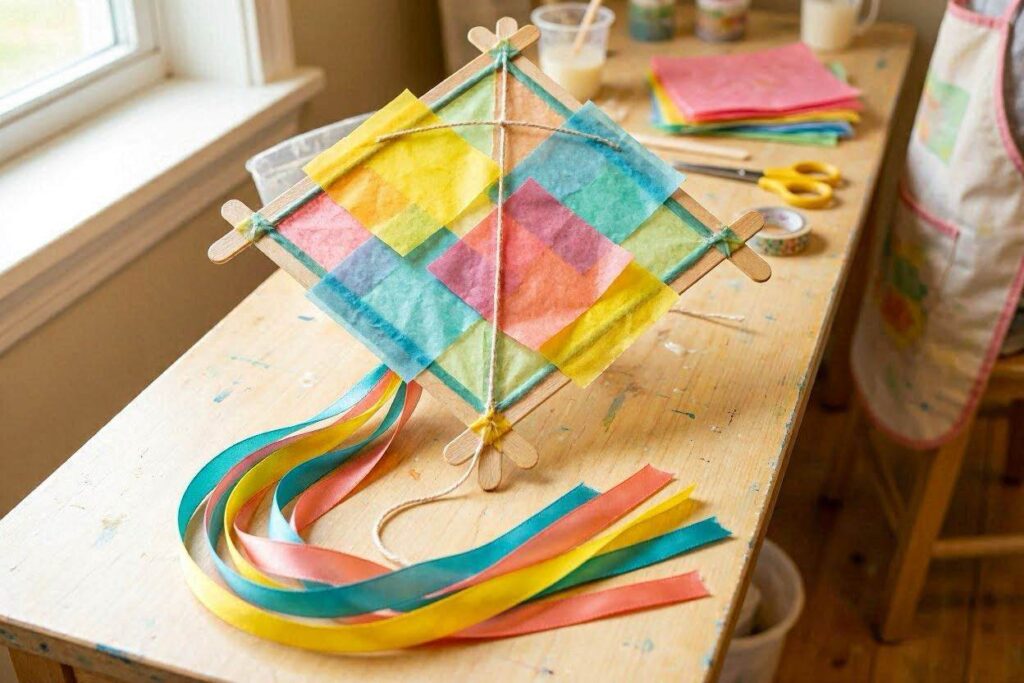
Materials needed: 4 popsicle sticks, tissue paper, school glue, string or yarn for the tail, and a longer piece of string for flying.
Step by step:
- Arrange 4 sticks into a diamond shape by crossing two sticks and overlapping ends at a slight angle.
- Glue all four connection points firmly.
- Let dry, then lay the frame on tissue paper and trace around it.
- Cut the tissue paper slightly larger than the frame.
- Fold the edges over the frame and glue them down.
- Tie a ribbon tail to the bottom point and a flying string to the center.
These do not actually fly like full kites, but they look beautiful and make wonderful room decorations. For outdoor use on very windy days, they can catch some air while running.
32. Popsicle Stick Watercolor Resist Art
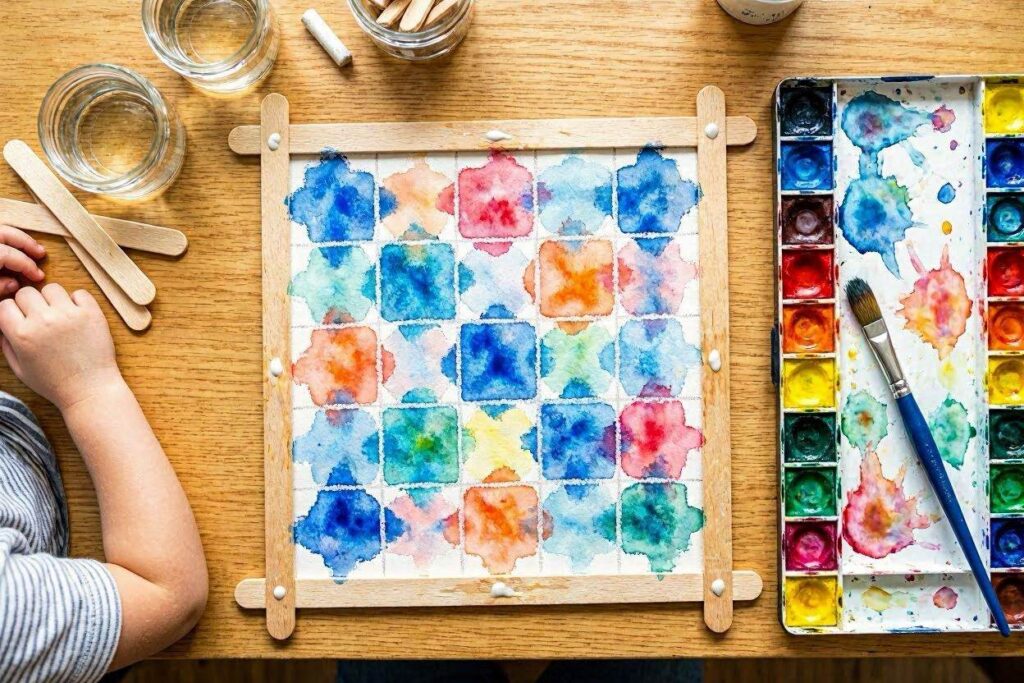
Materials needed: 8 popsicle sticks, school glue, watercolor paper, white crayons, watercolor paints, paintbrushes.
Steps:
- Build a simple frame by gluing four sticks into a square, then adding four more sticks diagonally for decoration.
- While the frame dries, use a white crayon to draw patterns on watercolor paper.
- Paint over the whole paper with watercolor paint, watching the white crayon resist the paint.
- Once dry, glue the finished watercolor painting behind the popsicle stick frame.
The magic reveal of the crayon resist is always a wonderful surprise for kids. This particular popsicle stick craft for kids combines two techniques in one sitting, and the results are always beautiful.
33. Popsicle Stick Kalimba
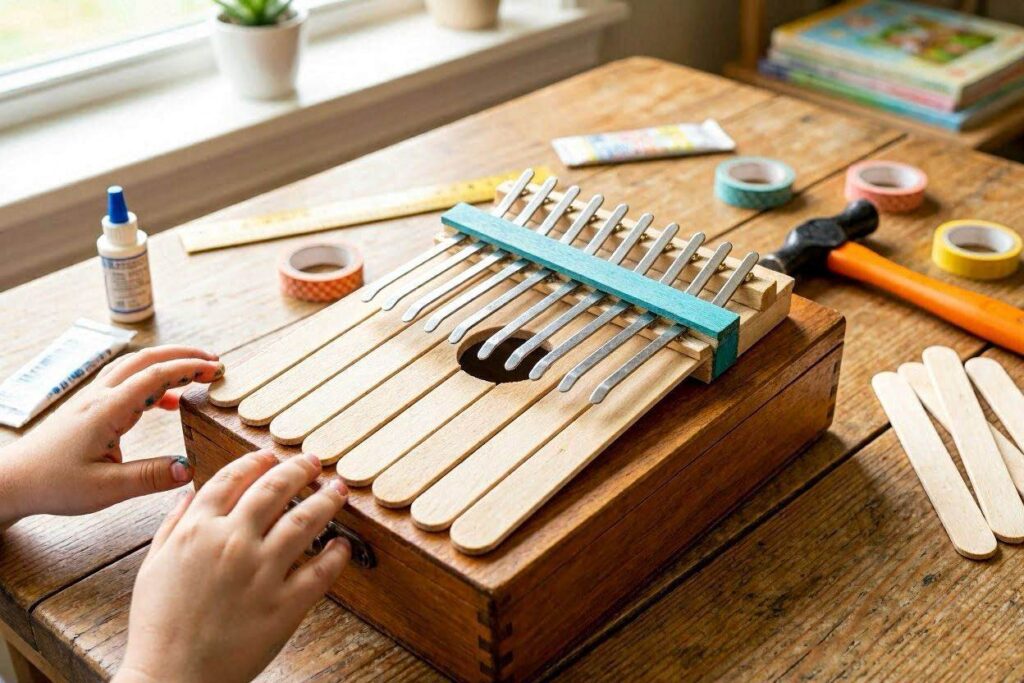
Materials needed: A small wooden or sturdy cardboard box, 7 to 8 popsicle sticks, a strong rubber band or tape to secure them, and paint.
Step by step:
- Decorate the box with paint and let it dry.
- Cut popsicle sticks to graduated lengths.
- Arrange them side by side from shortest to longest along one edge of the box, each extending past the edge by varying amounts.
- Secure all sticks together at the base with a thick rubber band stretched across the box, or use strong tape.
- The sticks should be able to vibrate when plucked.
- Pluck the extended ends of each stick to produce sounds.
Each stick length makes a slightly different tone. It is a surprisingly effective little instrument for a homemade toy, and it is one of those popsicle stick crafts for kids that produces something genuinely playable.
34. Popsicle Stick Shadow Puppet Theatre
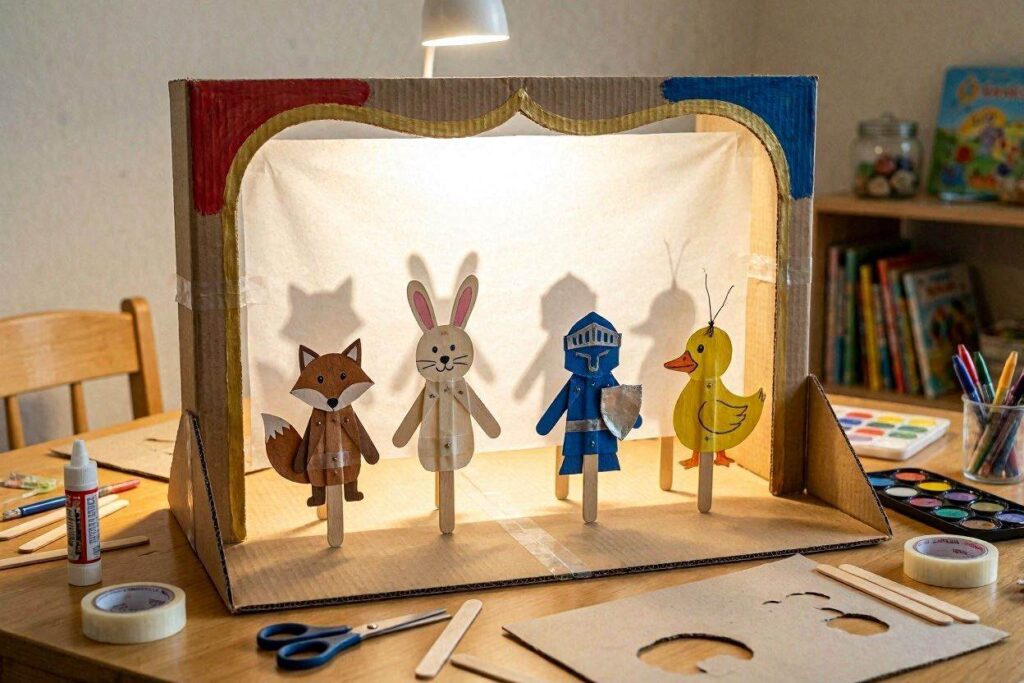
Materials needed: A cardboard box, scissors, white tissue paper or thin white fabric, a flashlight, popsicle sticks, black foam or cardstock for puppet shapes, and school glue.
Step by step:
- Cut a large rectangle from the front of the box to act as the stage opening.
- Stretch and glue white tissue paper over the opening as the screen.
- Cut animal or character shapes from black foam or cardstock.
- Glue each shape to the tip of a popsicle stick.
- Shine the flashlight from behind the screen in a dark room.
- Hold the puppets between the light and the screen to cast shadows.
Shadow puppet shows keep kids entertained for a long time. Furthermore, they naturally develop storytelling skills, voice acting, and imaginative play. Pair this with the creative play ideas in this collection of 30 indoor activities for toddlers for a full indoor play day.
35. Popsicle Stick Shape Sorter
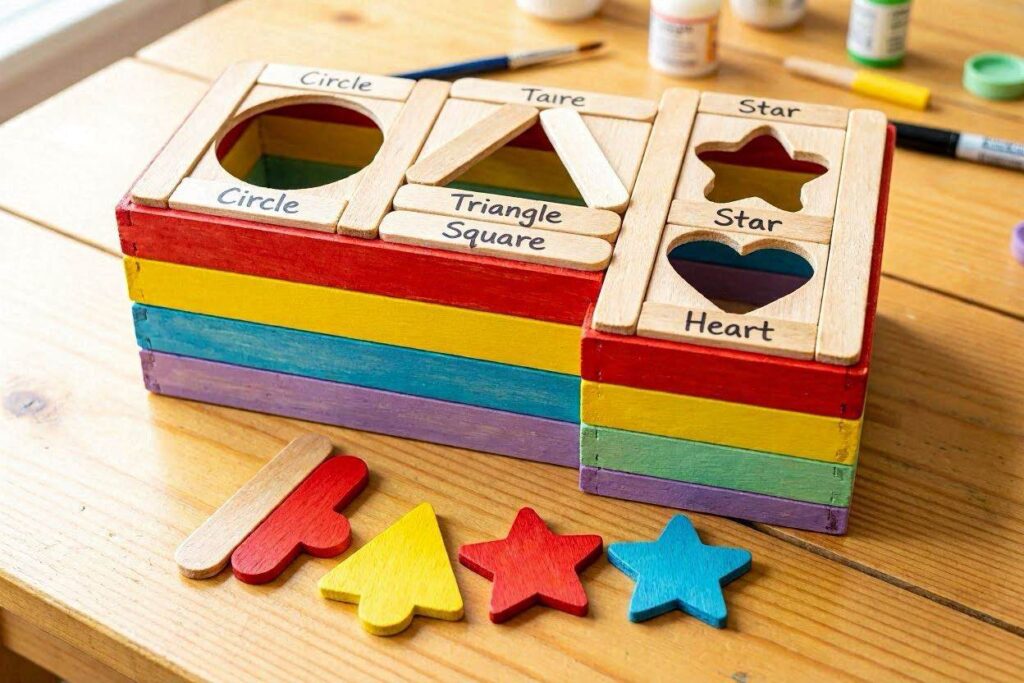
Materials needed: A small cardboard box, 20 popsicle sticks, school glue, scissors, foam sheets to cut shapes from, and paint.
Step by step:
- Cover all sides of the cardboard box by gluing popsicle sticks vertically on each surface.
- An adult cuts a circle, a square, a triangle, and a rectangle into the box lid.
- Cut matching shapes from thick foam sheets, sized just small enough to fit through each hole.
- Paint the box and let it dry.
- Let your toddler match each foam shape to the correct opening.
A homemade shape sorter is just as effective as a store-bought one, and kids feel extra ownership over a toy they watched be built. This rounds out a set of popsicle stick crafts for kids that covers creativity, learning, science, and play all in one list.
Tips to Make the Most of Popsicle Stick Crafts for Kids
Now that you have 35 ideas, here are a few practical tips to make every crafting session go smoothly.
Set up a dedicated craft tray. Keeping all materials on one tray means cleanup is faster and your child stays focused. When everything is contained, the whole activity feels more manageable for both of you.
Let the drying time be part of the plan. Glue needs time. Build in a natural break between making and using by setting completed projects aside and moving on to a second activity. Then come back to the finished piece together.
Involve kids in the prep. Letting kids paint the sticks before the main project begins adds an extra layer of ownership and also extends the activity naturally. Prepping materials together is genuinely part of the fun.
Display finished work. Putting completed popsicle stick crafts for kids on display sends a clear message that their work is valued. A shelf, a windowsill, or a wall gallery all work beautifully.
Save offcuts and broken sticks. Broken or trimmed pieces are perfect for mosaic art, collage, and filling gaps in projects. Nothing needs to go to waste.
If you want even more inspiration for creative kids’ activities, explore these easy DIY crafts and activities for kids, and also check out the Mom Life with Ada shop on Selar for printable activity kits and craft guides made specifically for busy moms.
Final Thoughts on Popsicle Stick Crafts for Kids
Popsicle sticks are affordable, versatile, and perfect for creative play. The 35 popsicle stick crafts in this post are designed to be fun, engaging, and rewarding, giving kids projects they can truly be proud of.
More than that, crafting together creates meaningful family moments while building creativity and important skills. So grab some Popsicle sticks, choose a project, and enjoy a fun-filled afternoon with your kids.
For more great activity ideas, take a look at these 50 easy toddler play ideas, and these printable coloring pages for kids to pair with your craft afternoons. And if your child is working on hand strength alongside these crafts, this post on 30 fine motor activities for toddlers at home is the perfect companion read.
Save this post! Pin it to your kids’ crafts board on Pinterest so you always have a fresh idea ready when the afternoon gets long.