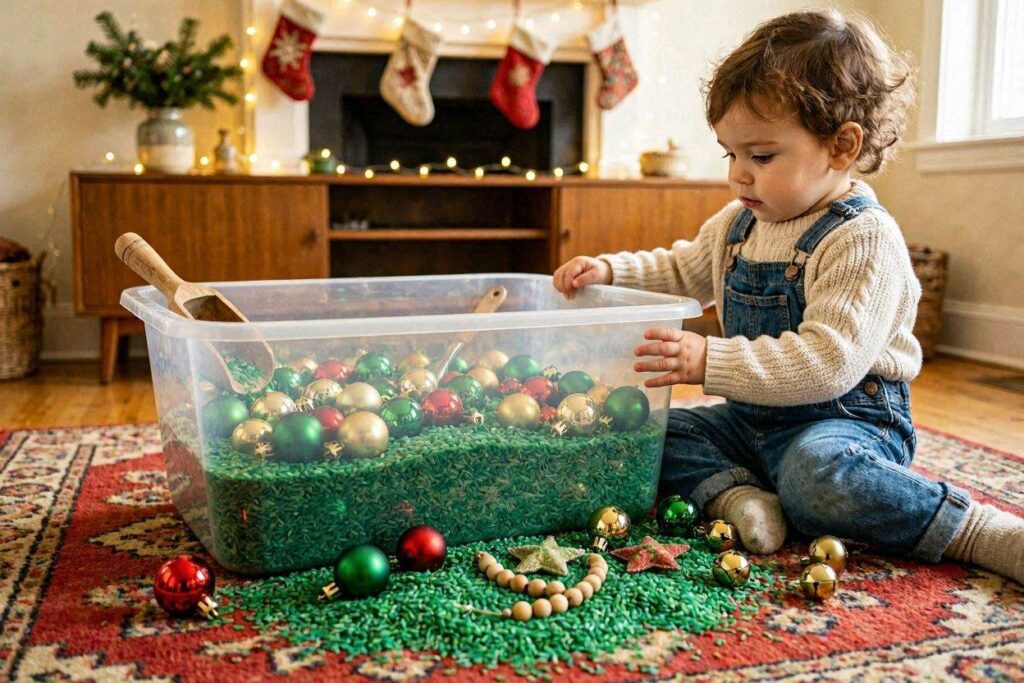
The Christmas decorations had been up for less than ten minutes when my toddler started pulling ornaments off the tree and loading them into a toy truck. Apparently, the tree was now a delivery station. That was the moment I started using a Christmas sensory bin for toddlers.
That is the thing about toddlers during Christmas. They are curious about everything. The ornaments sparkle, the lights blink, and every decoration seems designed to be touched, moved, or investigated.
After one too many battles over the Christmas tree, I discovered various Christmas sensory bins. They gave my toddler a festive space to scoop, pour, sort, and explore without turning my holiday decorations into toys. Even better, they kept little hands busy while helping develop fine motor skills, language, and creativity.
In this post, you’ll find easy Christmas sensory bin ideas, safe fillers for different ages, simple setup tips, and practical ways to keep the mess under control.
📌 Quick Note: This post contains affiliate links. I may earn a small commission if you purchase through them, at no extra cost to you.
Also, if you are looking for more toddler activity inspiration beyond the holidays, check out this list of 50 easy toddler play ideas moms can set up fast.
What to Put in a Christmas Sensory Bin (Safe Fillers by Age)
Choosing the right filler for your Christmas sensory bin is the most important step you will take before setting anything up. Not all fillers are safe for every age, and getting this right from the start means less worry for you and more fun for your toddler. Therefore, here is a full breakdown of safe Christmas sensory bin fillers grouped by age.
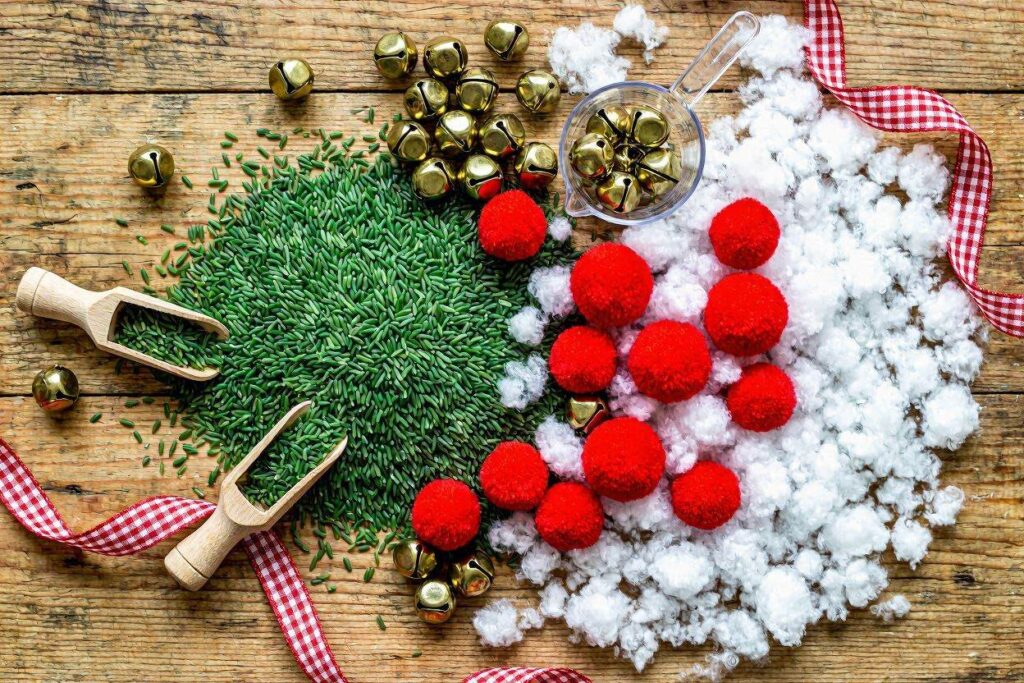
Safe Fillers for Babies and Young Toddlers (Under 18 Months)
Babies and very young toddlers explore everything with their mouths, so every filler at this stage needs to be large enough that it cannot be swallowed and completely non-toxic.
- Kinetic sand (non-toxic): Soft, squishy, and completely safe. It holds its shape and satisfies that urge to squeeze and pat.
- Large red and green pom poms: Big enough to grip, safe to mouth, and absolutely festive. They are also very easy to clean up.
- Crinkle paper in red and green: The sound alone will keep a baby entertained for a solid stretch of time.
- Fabric scraps in Christmas colors: Soft textures are perfect for sensory development at this stage.
- Large jingle bells: Make sure they are big enough that they cannot fit in a small mouth. The sound makes them extra excited.
Safe Fillers for Toddlers 18 Months and Older
At this stage, most toddlers are past the constant mouthing phase, though supervision is still important. These fillers open up a lot more creative Christmas sensory bin possibilities.
- Dyed rice (red and green): This is probably the most popular sensory bin filler for toddlers. It is inexpensive, easy to dye at home, and incredibly satisfying to scoop and pour.
- Oats or cornmeal: Both are natural, edible if accidentally eaten, and have a lovely texture for little hands.
- White cloud dough: Made from flour and baby oil, it has a soft, crumbly texture that is perfect for molding Christmas shapes.
- Large dried pasta: Farfalle or penne work beautifully in Christmas bins. You can dye them red and green for extra festivity.
- Fake snow (non-toxic Insta-Snow): This stuff is genuinely magical. It expands when water is added and looks exactly like real snow.
Safe Fillers for Preschoolers Ages 3 and Older
Preschoolers can handle much more detail and smaller items in their Christmas sensory bin. They are also at the stage where imaginative play really takes off, which means the bin becomes a whole little world for them.
- Small shatterproof ornaments: These add a beautiful visual element and encourage careful handling.
- Mini pinecones: Wonderful for a nature-inspired Christmas sensory bin. They add great texture.
- Dried cranberries or popcorn: A festive and largely mess-free option for supervised sensory play.
- Buttons and felt shapes: Stars, trees, and Christmas shapes made from felt are perfect for sorting and storytelling.
- Small wrapped empty boxes: Mini gift boxes spark imaginative play in a big way.
For even more sensory play inspiration at different developmental stages, this guide to the best sensory play activities for babies 6 to 12 months is a wonderful place to start if you have a younger baby at home.
12 Christmas Sensory Bin Ideas Your Toddler Will Absolutely Love
Now that you know what to use as a filler, here comes the best part: 12 detailed Christmas sensory bin ideas with step-by-step setup instructions, materials lists, age ranges, and mess level ratings for each one. Additionally, each bin is designed to build real developmental skills while keeping your toddler happily occupied. You can also find even more holiday sensory bin toddler inspiration over on my Pinterest Board.
1. Snowy Santa’s Workshop Bin
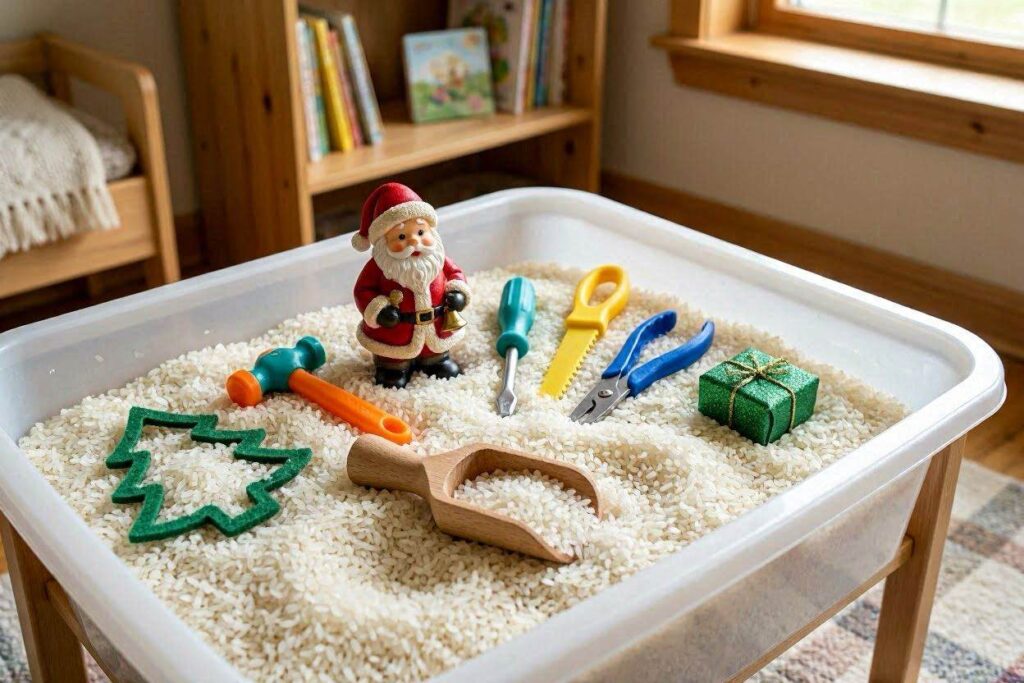
Materials Needed
- White rice or non-toxic fake snow (1 to 2 cups)
- Mini toy tools (hammer, wrench, screwdriver in plastic)
- Small Santa figurine
- Plastic bin or storage tote
- Scoops or small spoons
Step-by-Step Setup
- Pour white rice or fake snow into the bin as the base filler.
- Add the mini tools around the bin, partly buried in the snow.
- Place the Santa figurine in the center as the main character.
- Add scoops and spoons so your toddler can dig and discover.
- Optionally, add small empty gift boxes or mini wrapping paper scraps.
| What You Need | Age Range | Skills It Builds | Mess Level |
| White rice or fake snow, mini tools, Santa figurine, scoops | 18 months and up | Imaginative play, fine motor skills, language development | Medium |
2. Christmas Tree Sensory Bin
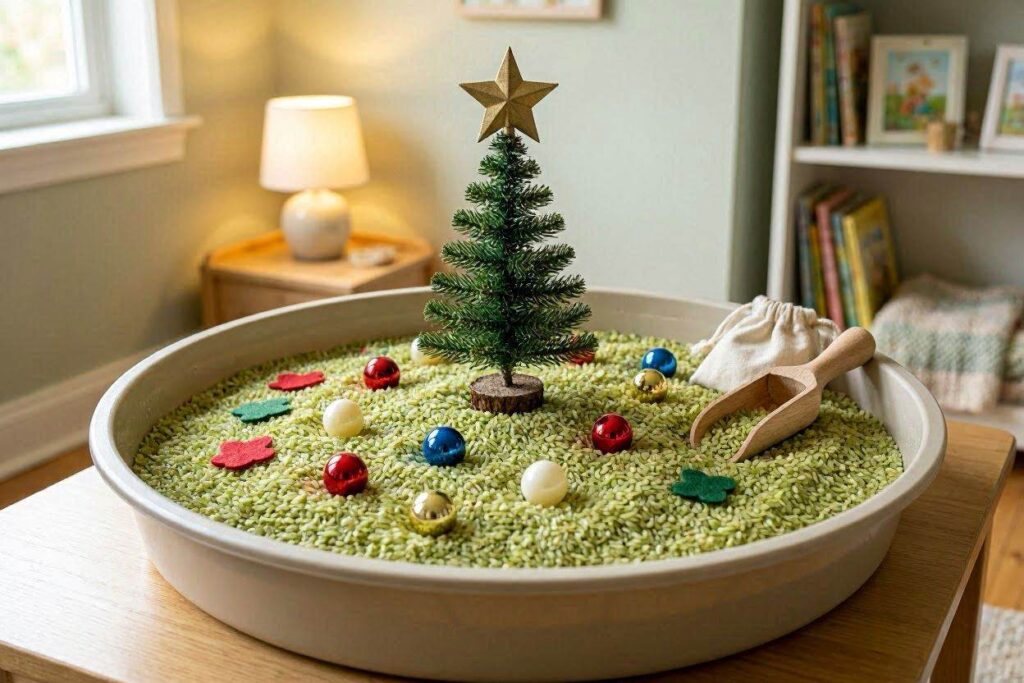
Materials Needed
- Green dyed rice (1 to 2 cups)
- Small shatterproof ornaments in assorted colors
- A star-shaped foam or plastic topper
- Plastic bin
- Small tongs or spoons for scooping
Step-by-Step Setup
- Dye your rice green the night before, using green food coloring and white vinegar. Let it dry completely on a baking sheet.
- Pour green rice into the bin.
- Scatter small ornaments throughout the rice.
- Place the star topper on top or half-buried for extra discovery fun.
- Add tongs for a fine motor challenge with older toddlers.
| What You Need | Age Range | Skills It Builds | Mess Level |
| Green dyed rice, shatterproof ornaments, star topper, tongs | 18 months and up | Color recognition, fine motor skills, sorting | Medium |
3. Reindeer Stable Sensory Bin
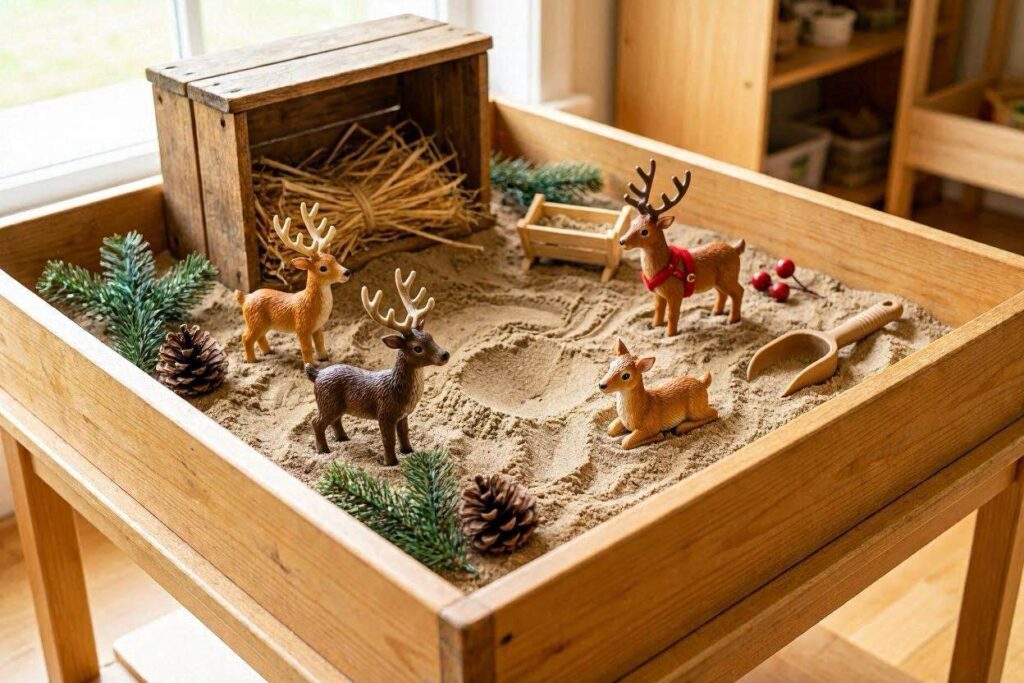
Materials Needed
- Brown kinetic sand (available at most dollar stores or toy shops)
- Toy reindeer figurines (3 to 5 pieces)
- Fake hay or straw (craft store raffia works perfectly)
- Small plastic bin
- Plastic fence pieces (optional but fun)
Step-by-Step Setup
- Pour brown kinetic sand into the bin as the stable floor.
- Scatter fake hay or raffia across the surface.
- Position reindeer figurines around the bin.
- Add the fence pieces around the edges to create a stable enclosure.
- Let your toddler move the reindeer around and create their own stable story.
| What You Need | Age Range | Skills It Builds | Mess Level |
| Brown kinetic sand, toy reindeer, fake hay, optional plastic fence | 2 years and up | Imaginative play, storytelling, sensory exploration | Low |
4. North Pole Ice Sensory Bin
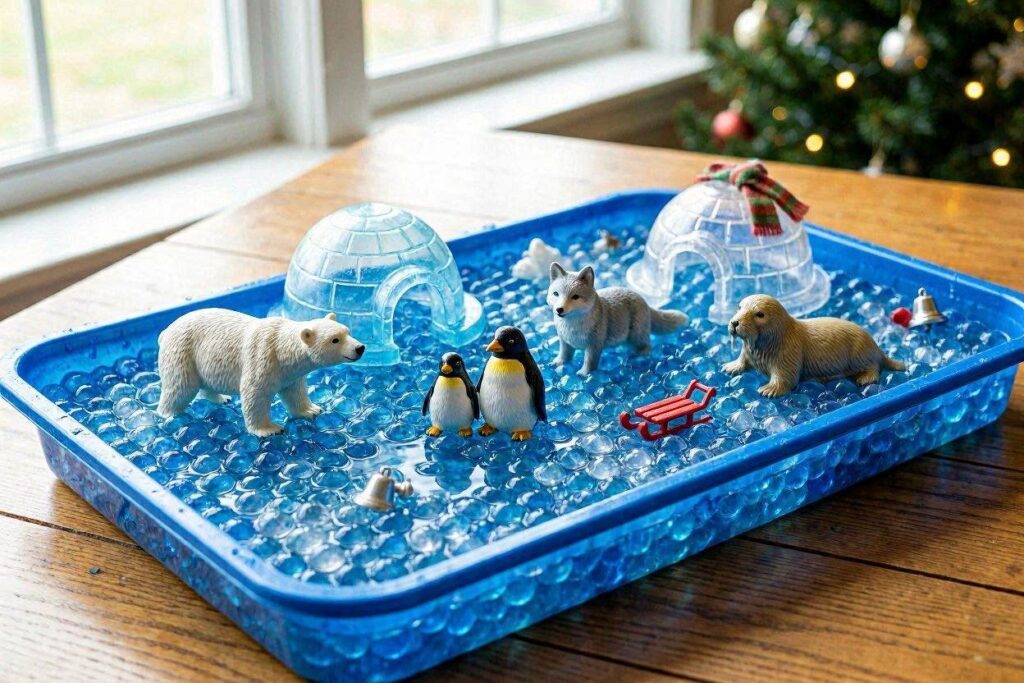
Materials Needed
- Blue and clear water beads (soaked overnight beforehand)
- Arctic animal figurines, such as polar bears and penguins
- Small plastic igloos or foam snowflake shapes
- Plastic bin with raised sides
Step-by-Step Setup
- Soak your water beads in cold water overnight until fully expanded.
- Drain the beads and pour them into the bin.
- Add Arctic animals and igloos throughout the bin.
- For extra magic, add a few pieces of white foam cut into iceberg shapes.
- Supervise closely, especially with younger toddlers, since water beads are a choking hazard for children under 3.
| What You Need | Age Range | Skills It Builds | Mess Level |
| Blue and clear water beads, Arctic animals, plastic igloos | 3 years and up with supervision | Sensory texture exploration, imaginative play, fine motor skills | Medium |
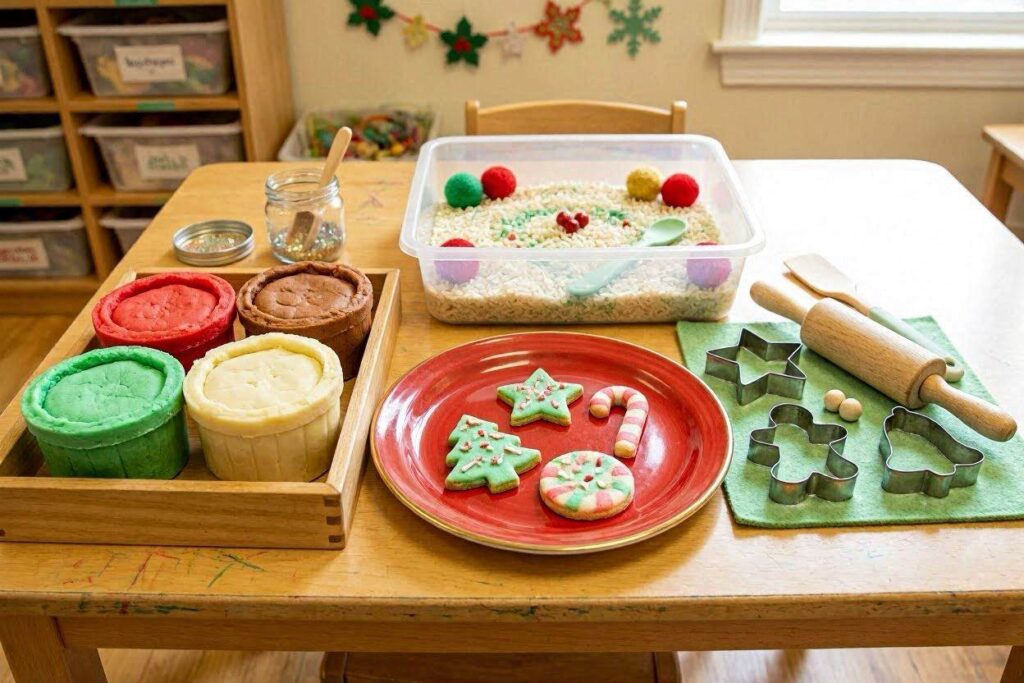
5. Gingerbread Bakery Sensory Bin

Materials Needed
- Brown kinetic sand (2 cups)
- Christmas cookie cutters in various shapes
- Small rolling pin
- Muffin tin or baking tray (toy-sized)
- Plastic bin
Step-by-Step Setup
- Add brown kinetic sand to the bin and slightly pat it flat.
- Place cookie cutters, the rolling pin, and the muffin tin inside.
- Show your toddler how to press the cookie cutters into the sand to make shapes.
- Let them roll, cut, and fill the muffin tin with their pretend gingerbread.
- Add a small pinch of cinnamon to the sand for a cozy gingerbread scent that makes the play even more immersive.
| What You Need | Age Range | Skills It Builds | Mess Level |
| Brown kinetic sand, Christmas cookie cutters, small rolling pin, muffin tin | 18 months and up | Fine motor skills, pretend play, sensory processing | Low |
6. Candy Cane Color Sort Sensory Bin
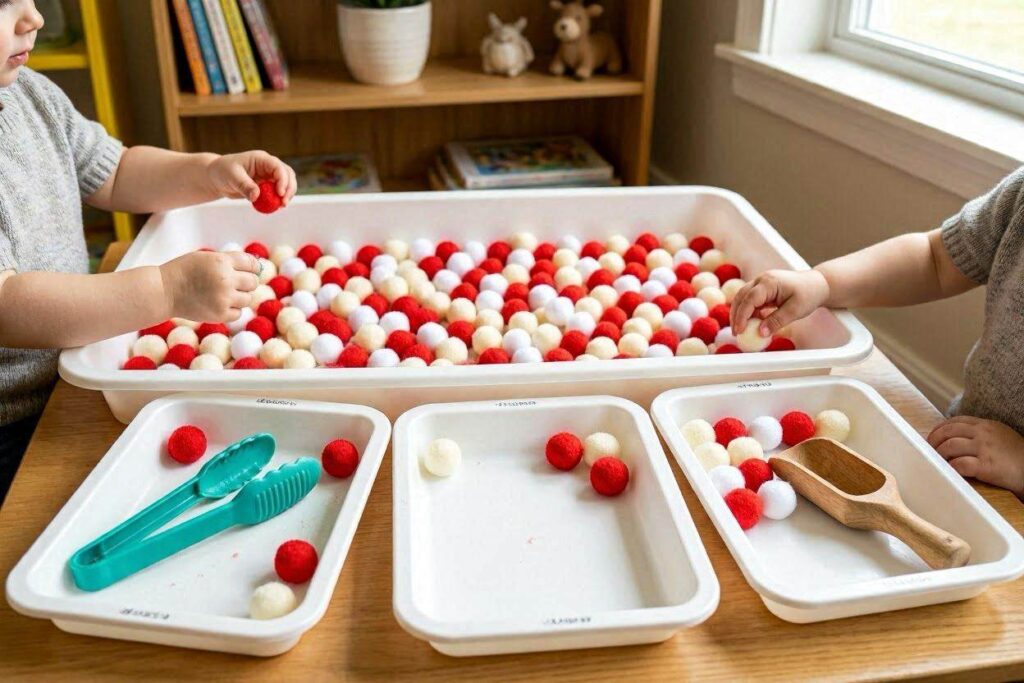
Materials Needed
- Red pom poms (large)
- White pom poms (large)
- A sorting tray or two small bowls
- Tongs or large tweezers
- Plastic bin or tray
Step-by-Step Setup
- Mix the red and white pom poms in the bin.
- Place one red bowl and one white bowl beside the bin.
- Show your toddler how to sort the pom poms by color into the correct bowl.
- Add tongs for children who are ready for an extra fine motor challenge.
- Count together as you sort to add a simple math concept into the play.
| What You Need | Age Range | Skills It Builds | Mess Level |
| Red and white pom poms, sorting tray, optional tongs | 18 months and up | Color recognition, fine motor skills, early math concepts | Low |
7. Christmas Forest Sensory Bin
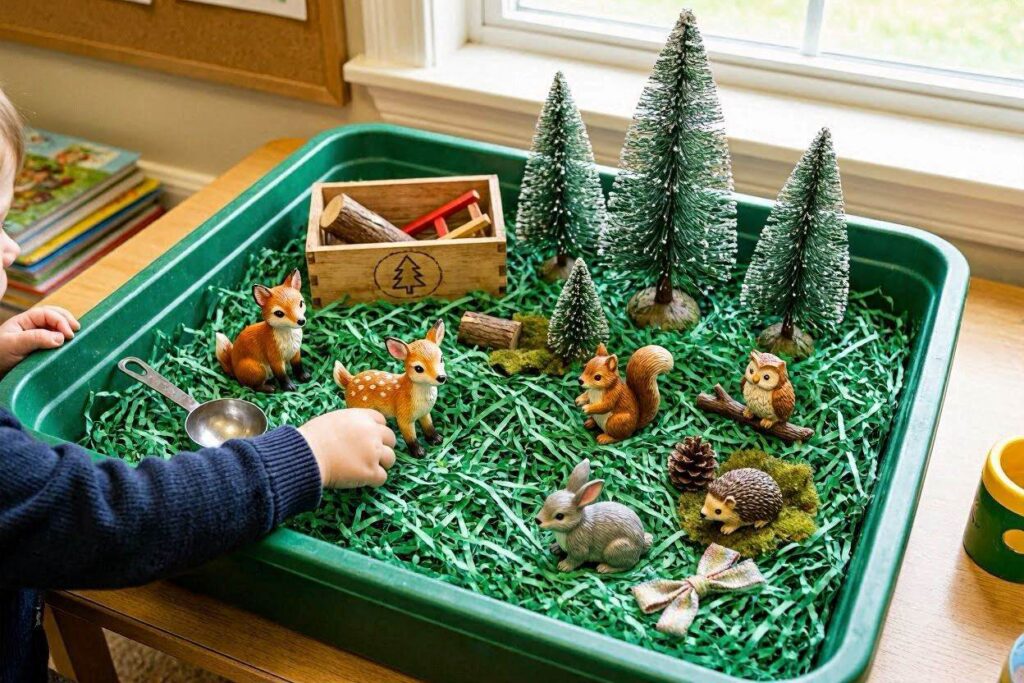
Materials Needed
- Shredded green paper (gift bag filler or shredded construction paper)
- Mini Christmas tree figurines or foam trees
- Small woodland animal figurines such as deer, foxes, and owls
- Plastic bin
- Small scoops or cups
Step-by-Step Setup
- Layer shredded green paper into the bin as the forest floor.
- Stand mini trees upright in the paper, pressing them in slightly so they stay in place.
- Add woodland animal figurines around and between the trees.
- Let your toddler move the animals, hide them under the paper, and build their own forest story.
- Add a few pinecones or small rocks for extra texture and natural play elements.
| What You Need | Age Range | Skills It Builds | Mess Level |
| Shredded green paper, mini trees, woodland animal figurines, pinecones | 18 months and up | Imaginative play, sensory exploration, storytelling | Medium |
8. Gift Wrapping Station Sensory Bin
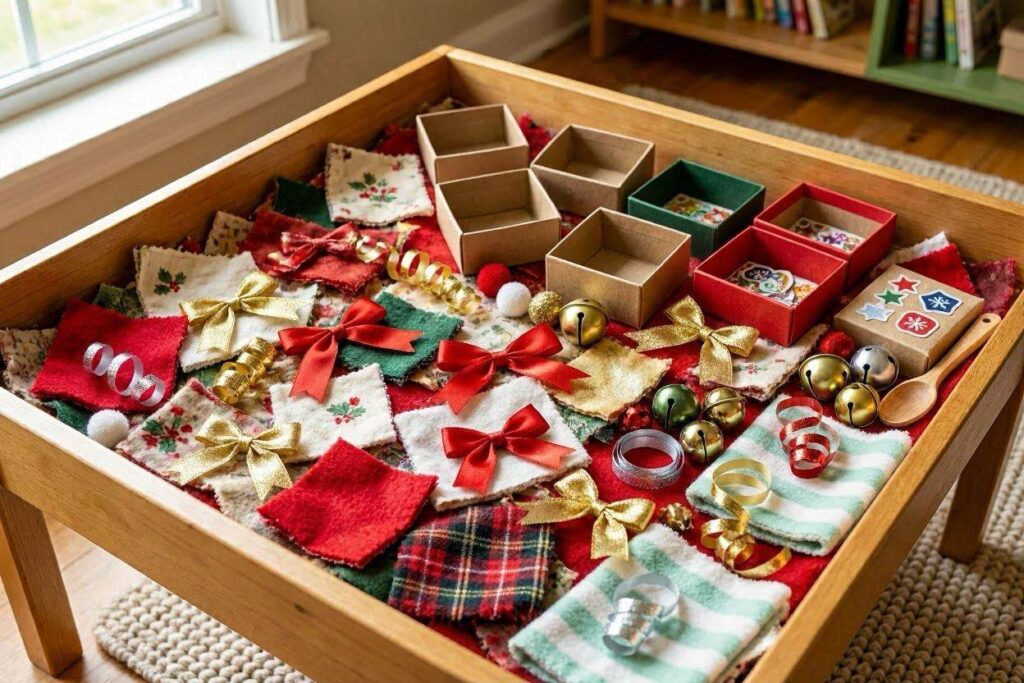
Materials Needed
- Fabric scraps in Christmas colors
- Ribbon bows in various sizes
- Small empty boxes wrapped in plain paper
- Plastic bin
- Tape (toddler-safe)
Step-by-Step Setup
- Layer fabric scraps into the bin as the base.
- Add ribbon bows and small wrapped boxes throughout.
- Show your toddler how to wrap the boxes with fabric scraps.
- Let them stick bows on and create their own gift pile.
- This bin is especially great right before Christmas when gift excitement is at its highest.
| What You Need | Age Range | Skills It Builds | Mess Level |
| Fabric scraps, ribbon bows, small empty boxes | 2 years and up | Pretend play, fine motor skills, creativity | Low |
9. Cocoa Sensory Bin
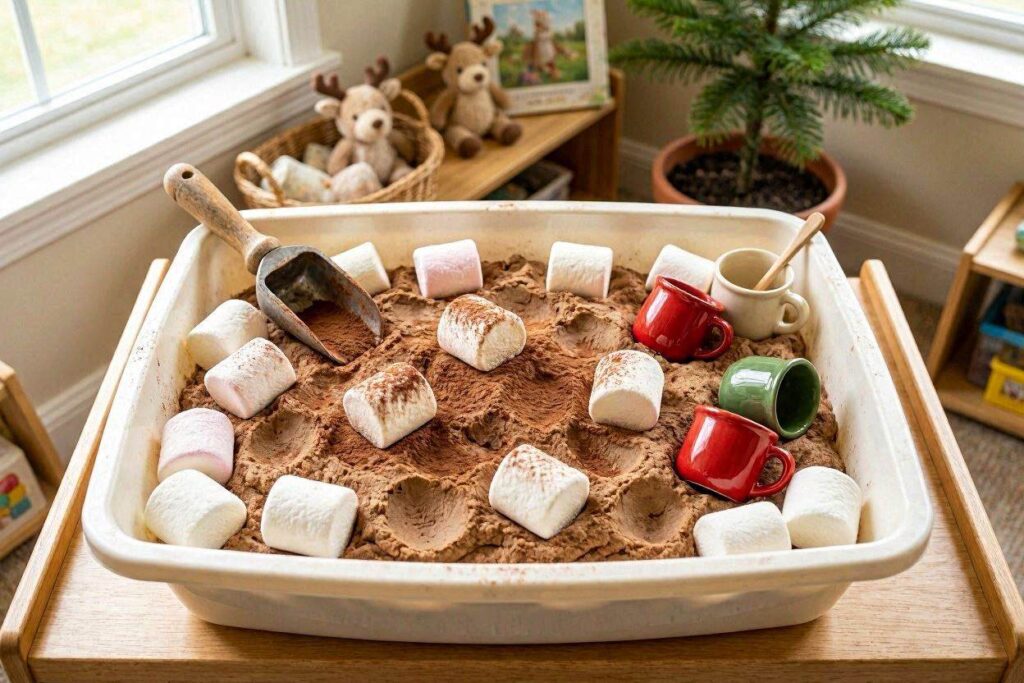
Materials Needed
- Brown cloud dough (mix 8 cups of flour with 1 cup of baby oil and a few tablespoons of cocoa powder)
- Large marshmallows
- Small toy mugs or cups
- Plastic spoons or scoops
- Plastic bin
Step-by-Step Setup
- Mix the cloud dough the day before and store it in a sealed bag.
- Pour the cloud dough into the bin and gently break it apart.
- Add large marshmallows throughout the bin.
- Place small mugs and plastic spoons inside for pouring and scooping play.
- The cocoa scent makes this one of the most sensory-rich Christmas activities for toddlers you will ever set up.
| What You Need | Age Range | Skills It Builds | Mess Level |
| Brown cloud dough, large marshmallows, toy mugs, spoons | 18 months and up | Sensory processing, pretend play, fine motor skills | Medium |
10. Elf Workshop Sensory Bin
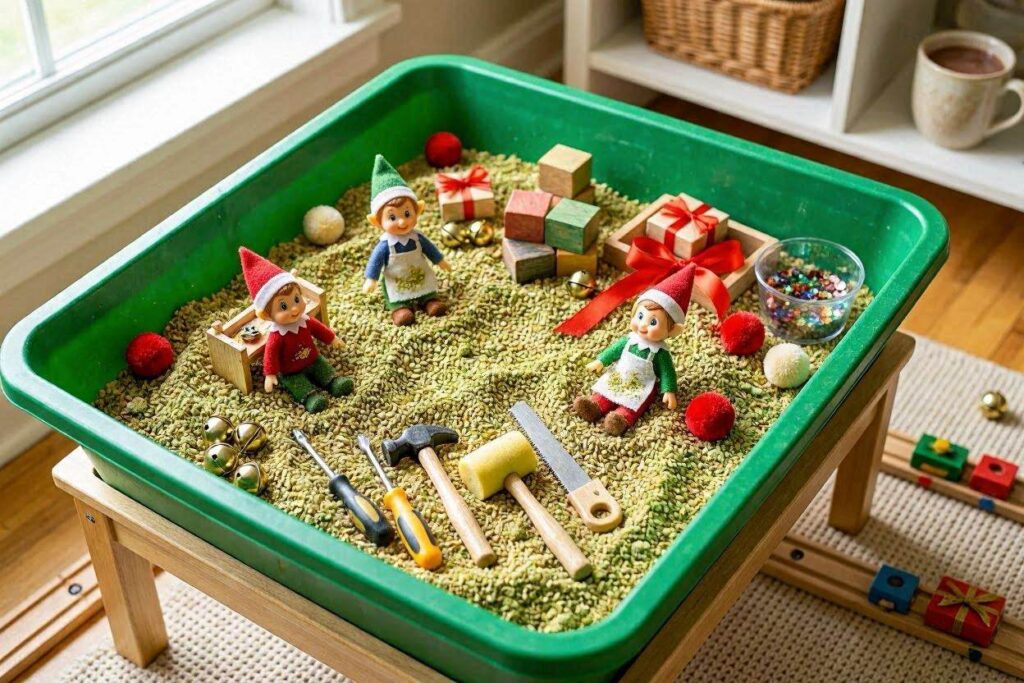
Materials Needed
- Green dyed oats (color with green food coloring and spread to dry)
- Elf figurines
- Mini toy tools or craft sticks
- Small plastic bin
- Scoops and cups
Step-by-Step Setup
- Dye oats green and allow them to dry fully on a baking tray before use.
- Pour the green oats into the bin.
- Add elf figurines and mini tools across the bin.
- Include scoops, cups, and small containers for filling and pouring.
- Tell your toddler the elves are building toys and need their help to sort and move things around the workshop.
| What You Need | Age Range | Skills It Builds | Mess Level |
| Green dyed oats, elf figurines, mini tools, scoops | 18 months and up | Imaginative play, sensory exploration, language development | Medium |
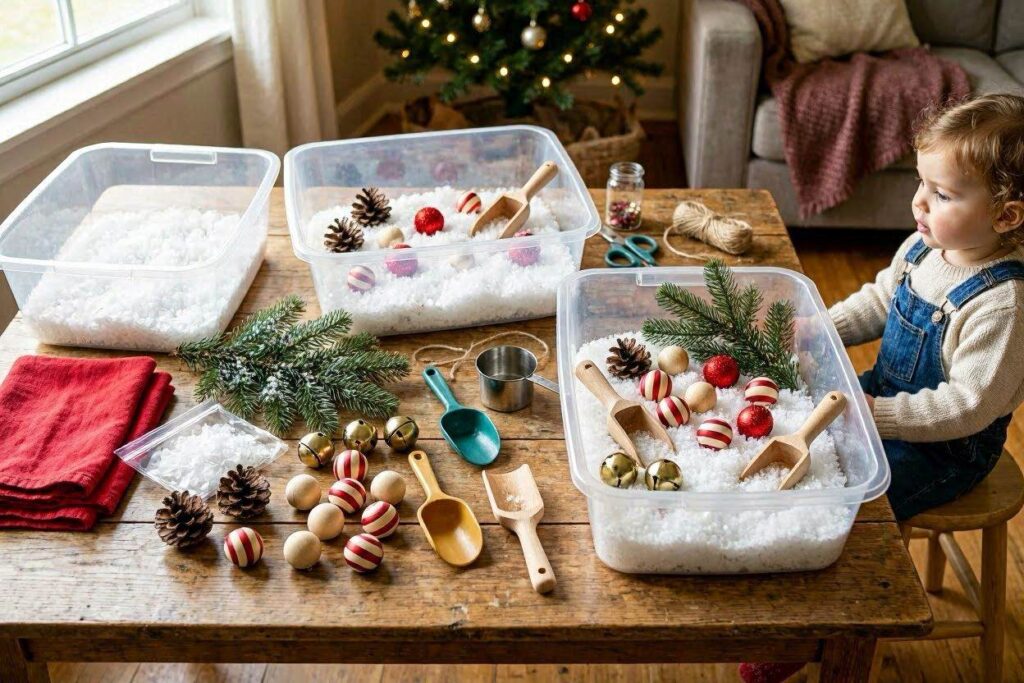
11. Frozen Winter Sensory Bin
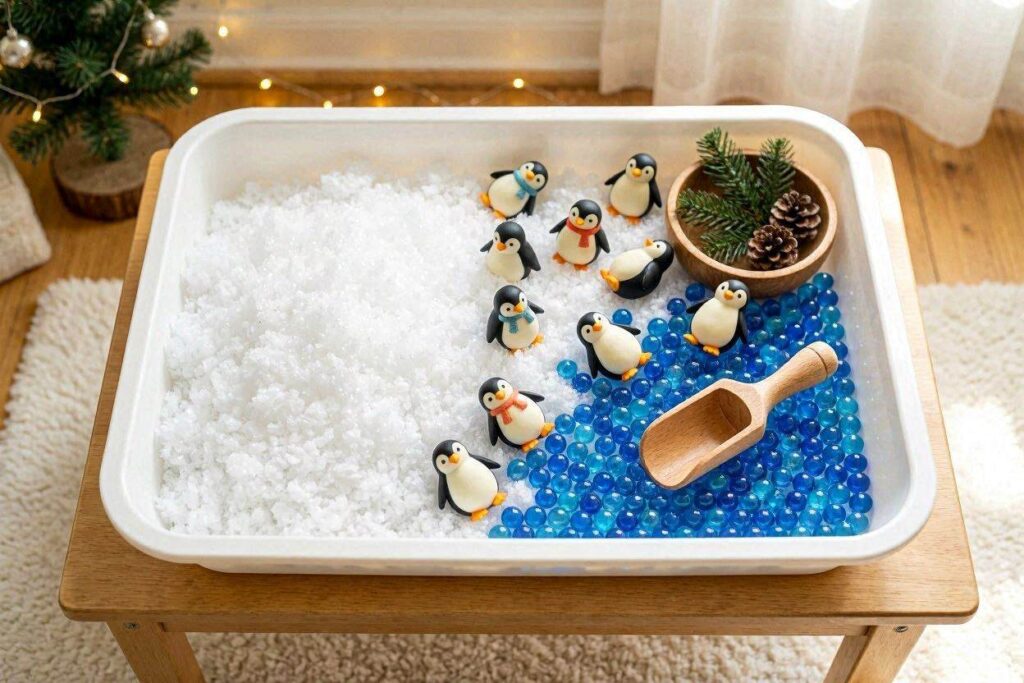
Materials Needed
- Non-toxic fake snow (Insta-Snow or similar)
- Blue water beads (pre-soaked)
- Penguin figurines and plastic snowflake shapes
- Plastic bin with high sides
Step-by-Step Setup
- Prepare the fake snow according to the package instructions and let it cool.
- Soak water beads overnight and drain.
- Add fake snow to one side of the bin and blue water beads to the other to create a winter landscape.
- Place penguin figurines and snowflake shapes across both areas.
- Give your toddler cups and spoons for scooping both textures.
| What You Need | Age Range | Skills It Builds | Mess Level |
| Fake snow, blue water beads, penguin figurines, plastic snowflakes | 3 years and up with supervision | Texture comparison, sensory processing, imaginative play | High |
12. Santa’s Cookie Plate Sensory Bin
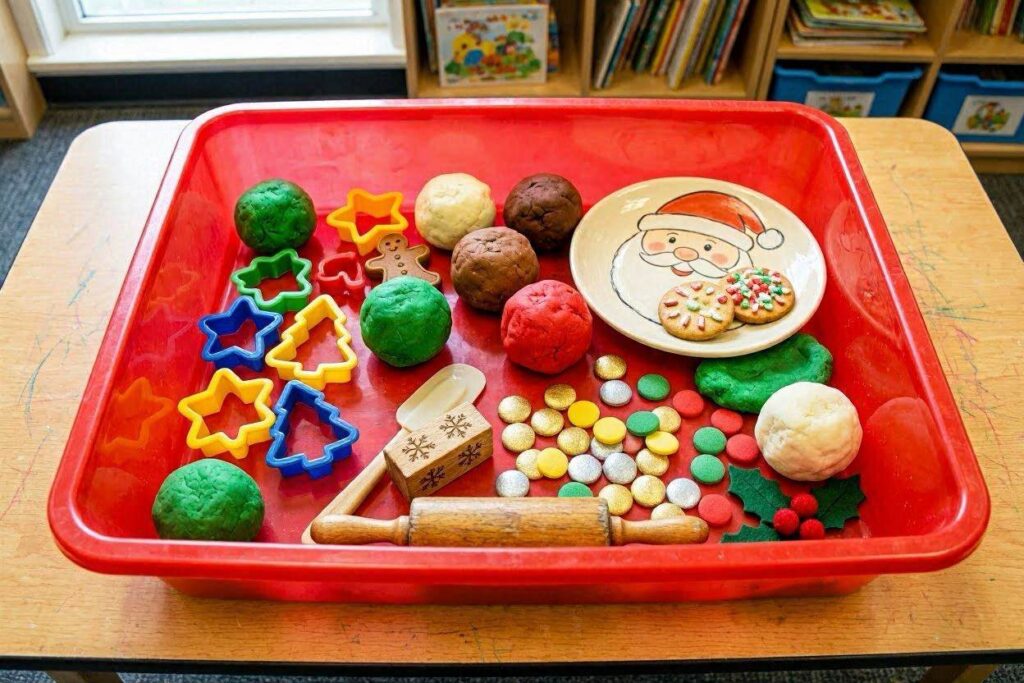
Materials Needed
- Homemade or store-bought playdough (red, green, and white)
- Christmas cookie cutters
- Rolling pin
- Decorating sprinkles (for supervised preschoolers only)
- Plastic plate
Step-by-Step Setup
- Set out the playdough in red, green, and white on the tray.
- Place cookie cutters, a rolling pin, and a plastic plate inside.
- Invite your child to roll, cut, and decorate Christmas cookies for Santa.
- For preschoolers who are past mouthing everything, a small container of craft sprinkles adds a wonderful sensory detail.
- Set the finished plate near the Christmas tree for extra imaginative play magic.
| What You Need | Age Range | Skills It Builds | Mess Level |
| Playdough in Christmas colors, cookie cutters, rolling pin, sprinkles for 3+ | 2 years and up | Fine motor skills, creativity, pretend play | Low to Medium |
If you want even more ideas specifically for younger toddlers, this post on sensory bin ideas for 2 year olds that actually keep them busy has more focused options for that age group.
What Skills Does Christmas Sensory Play Build in Toddlers?
Before you set up your next Christmas sensory bin, it genuinely helps to understand why sensory play matters so much at this stage. Toddlers learn almost entirely through their senses, so every time your child scoops, pours, sorts, and explores inside a bin, they are actively building skills that will serve them for years.
Specifically, here is what regular holiday sensory bin toddler play supports:
- Fine motor development: Scooping, pinching, pouring, and squeezing all strengthen the small muscles in your toddler’s hands that they will later use for writing and drawing.
- Language development: Sensory bins give toddlers a reason to talk. As they play, they describe what they feel, name colors and shapes, and tell stories.
- Cognitive skills: Sorting, matching, and filling containers build early math and problem-solving skills in a very natural and enjoyable way.
- Emotional regulation: Hands-on sensory play is genuinely calming for most toddlers. That repetitive scooping and pouring motion has a self-soothing quality that reduces overwhelm.
- Imaginative play: As soon as you add figurines, little tools, or props to a bin, the storytelling begins. This kind of open-ended imaginative play is deeply important for social and emotional development.
Additionally, if you are interested in exploring more ways to build fine motor skills beyond sensory bins, this list of 30 fine motor activities for toddlers at home that actually work is packed with simple ideas.
How to Set Up a Christmas Sensory Bin (Step-by-Step Guide for Moms)
Setting up a sensory bin does not need to be complicated or time-consuming. In fact, most of these Christmas sensory bin ideas take less than 10 minutes to prepare once you have your supplies ready. Furthermore, with the right setup, you can absolutely keep the mess under control. Here is exactly how to do it.
Step 1: Choose the Right Bin
A shallow plastic storage tote works best for most sensory bins. Look for one that is wide enough for your toddler to reach both arms in comfortably, with sides high enough to catch most of the filler. A 41-quart plastic bin is ideal for most ages. However, a baking sheet with edges also works perfectly well for fillers like playdough or cloud dough.
Step 2: Prepare Your Filler in Advance
If you are using dyed rice or oats, prepare them the night before. Spread them on a baking sheet to dry completely before putting them in the bin. This step matters because wet filler clumps and becomes unpleasant very quickly. Similarly, water beads need to soak overnight to expand properly.
Step 3: Set Up the Bin Before Your Child Sees It
Layer your filler first, then add props, figurines, and scoops. Setting up the bin before your toddler sees it builds anticipation and also means you can arrange everything intentionally. Moreover, a visually appealing bin is much more likely to capture your toddler’s attention right from the start.
Step 4: Create a Mess Containment Zone
Place the bin on top of a plastic tablecloth, a large splat mat, or simply a cheap vinyl shower curtain from the dollar store. This single step will save your floors and your sanity. For high-mess bins like fake snow or water beads, consider setting the bin on the floor in a corner so the mess goes in one direction only.
Step 5: Stay Nearby and Engage
Sensory bins are not purely a drop-and-leave activity, especially for toddlers under 2. Sit with your child, narrate what they are doing, and ask questions. This is where the real language development magic happens. Even something as simple as saying ‘You scooped the green rice into the cup!’ is genuinely building vocabulary and comprehension in real time.
Step 6: Have a Clean-Up Plan Ready
Before you start, place a small container and a brush or broom nearby. For rice, a handheld vacuum is a total game-changer. For cloud dough or kinetic sand, slightly damp hands will pick up any stray crumbs from surfaces. Having the tools ready means clean-up takes 3 minutes instead of 15.
If you are planning lots of indoor toddler activities this winter, you will love this collection of 30 indoor activities for toddlers when you are stuck at home. It covers a wide range of options beyond sensory bins.
Frequently Asked Questions About Christmas Sensory Bins
How long will my toddler actually play with a sensory bin?
Honestly, this depends on the age and the bin. A well-set-up Christmas sensory bin can hold a toddler’s attention for anywhere from 15 minutes to over an hour. Generally, bins with more props and figurines tend to keep children engaged longer because the imaginative play element adds depth.
Can I reuse the filler?
Yes, absolutely. Store dry fillers like dyed rice, oats, or pom poms in a sealed container or ziplock bag between uses. Most fillers last for several weeks of play if they are kept dry and clean. Cloud dough can be stored in an airtight container for up to two weeks.
My toddler keeps throwing the filler out of the bin. What do I do?
This is completely normal toddler behavior, particularly in the 18 to 24-month range. First, use a deeper bin to physically limit how far the filler can travel. Second, offer your toddler a wide variety of tools like cups, scoops, and containers to channel that scooping energy into the bin rather than outside of it.
Are sensory bins safe for babies?
Sensory bins can be safely used with babies when the right fillers are chosen. Large pom poms, crinkled paper, and fabric scraps are all safe for babies as young as 6 months with close supervision. You can find more specific ideas in this guide to edible sensory play ideas for babies.
What is the easiest Christmas sensory bin to set up?
The candy cane color sort bin is probably the fastest and simplest option on this list. All you need is red and white pom poms and two small bowls. You can have it ready in under two minutes, which makes it perfect for those days when you need a quick activity without any prep.
How do I get my toddler interested in the bin if they ignore it?
Sit down and play with it yourself first. Toddlers are naturally drawn to what their parents are doing, so if you start scooping the rice or moving the figurines around, your toddler will almost always come to investigate. Starting the play yourself is the single most effective strategy for drawing in a reluctant toddler.
You Are Ready to Make This the Best Christmas Yet
Christmas sensory bins are more than just educational; they give toddlers a calm, hands-on way to explore during an overstimulating season.
They also give you a breather: a happy, engaged child, a manageable mess, and a few peaceful moments in the chaos of the holidays.
Start with just one simple bin and build from there. Even one or two setups can make your holiday season feel much easier and more enjoyable.
And if you are a mom who needs a little something for yourself in between all the setting up and the cleaning, this round-up of 50 cozy self-care ideas every tired mom needs was made specifically for you.
For even more activity ideas to keep your toddler busy throughout the season, do not miss this post on 25 easy toddler activities at home moms can set up fast, which is full of simple and effective ideas for all skill levels.
Happy playing, and happy holidays from one mom to another.